


8
Introduction
3M™ Digital WallDisplay
© 3M 2005. All Rights Reserved.
IMPORTANT NOTES
• In some countries, the voltage is not stable. This appliance is designed to operate within a range of 100~240
Vac. In these countries, it is recommended to install a power stabilizer unit.
• Do not manually open or close the projection arm while the 3M Digital Wall Display is in operation.
• Save the shipping box and packing materials in the event the 3M Digital WallDisplay should ever need to be
moved.
• For other types of wall material (e.g. wood, concrete, concrete block) use mounting hardware that is properly
rated for the weight of the unit and is intended for specific wall material.
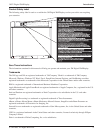
• Most of the weight is at the projection head/speakers end of the 3M Digital WallDisplay.
• Use the enclosed cables to ensure image and audio quality. Substituting cables of lesser quality may result in
poor image quality or audio noise.
• There is a 30-second reset period before the On/Off Button will function again. During this period, the On/Off
Button will flash red.
• If the 3M Digital WallDisplay will not be moved or disconnected, leave the Master Power Switch on for your
convenience.
• Do not turn off the Master Power Switch or unplug the power cord before pressing the On/Off Button.
After the On/Off Button is pressed, the fan continues for approximately five minutes to cool the 3M Digital
WallDisplay.
• The USB or serial mouse cable must be connected between the 3M Digital WallDisplay and the computer
when using Mouse mode.
• Avoid excessive heat and humidity. Do not mix old and new batteries or different types of batteries.
• You must hear or feel a distinctive snap to ensure facade is securely attached.
• Do not reset the lamp hours if the lamp cartridge was not changed. This can damage internal components.
• Before continuing with this adjustment, move the arm assembly up and down to relieve any stress and see if
the arm will realign itself and project an aligned image.
• After making adjustments it may be necessary to perform the side to side adjustment to center the image
properly.