


78
Using the Trigger Menu
Changing the Trigger Sequence
To add sequence levels
You can add sequence levels anywhere except after the final one.
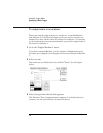
1 In the Trigger menu, select the number beside the sequence level
just after where you want to insert.
For example, if you want to insert a sequence level between levels 1
and 2, you would select level 2. To insert levels at the beginning, select
level 1.
A Sequence Level pop-up appears. Its exact contents depend on the
analyzer configuration and the level specification. However, all
Sequence Level pop-ups have an Insert Level field in the upper left
corner.
2 Select Insert Level.
Another pop-up offers the choices of Cancel, Before, or After. If the
level you started from was the last level, After will not appear.
3 Select Before.
The Trigger Function pop-up replaces the Sequence Level pop-up. The
functions available depend on whether the analyzer is configured as
state or timing.
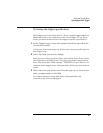
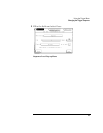
4 Use the knob to highlight a trigger function, and select Done.
A new Sequence level pop-up appears. Its contents reflect the trigger
function you just selected. The figure below shows a user trigger
function for a state analyzer.