37
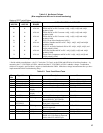
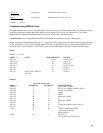
Table 3-2. No-Output Failures
(Bias supplies and AC turn-on circuit functioning)
Status of PFET on/off-Pulses
PWM-ON
A2J7-26
PWM-OFF
A2J7-25
DEFECTIVE
BOARD
CHECK FUNCTIONAL CIRCUITS
lo lo A2 Control ckts: CV & CC thru on- & off-Pulse Oneshots *
lo hi A2 & A4 PWM and DC-to-DC Converter: A4Q1, A4Q2, A4Q3 and A4Q4
probably failed
hi lo A2 & A4 PWM and DC-to-DC Converter: A4Q1, A4Q2, A4Q3 and A4Q4
probably failed
hi hi A2 & A4 PWM and DC-to-DC Converter: A4Q1, A4Q2, A4Q3 and A4Q4
probably failed
lo N A2 A2U15A,on-Pulse Oneshot and A2Q11
N lo A2 & A4 Off-Pulse Oneshot and DC-to-DC: A4Q1, A4Q2, A4Q3 and A4Q4
probably failed
hi N A2 & A4 A2U15A, on-Pulse Oneshot & DC-to-DC: A4Q1, A4Q2, A4Q3, and
A4Q4 probably failed
N hi A2 & A4 off-Pulse Oneshot and DC-to-DC: A4Q1, Q4Q2, A4Q3 and A4Q4
probably failed
N N A2 & A4 Power-Limit Comparator and DC-to-DC: A4Q1, A4Q2, A4Q3 and
A4Q4 probably failed
lo= TTL low hi= TTL high N = normal 20KHz pulse train, TTL levels
* Decide which to troubleshoot -- the CV Circuit, the CC Circuit, or the PWM and Off-Pulse & On-Pulse Oneshots -- by
measuring the CV CONTROL (A2CR24, cathode) and the CC CONTROL (A2CR11 cathode) voltages. Troubleshoot
whichever is negative, and if neither is negative, troubleshoot the PWM. Make these voltage measurements after you have
implemented the Main Troubleshooting Setup.
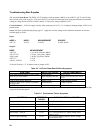
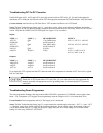
Table 3-3. Front Panel Board Tests
.
Pin
No
Signal Name Measurement Description Source
1 +7.5V 7.5V Derived from + 15V bias. A3VR2, A3R93
2 -1V -1.0V Derived from –15V bias. A3R89, A3R94, A3C17
3 CV VOLTAGE 0-5V For 0 to full scale output voltage. A3U6-6, A3R88, A3CR1
4 CC VOLTAGE 0-5V For 0 to full scale output current. A3U7-1, A3R58
5 VOLTS test -1888 on volts
display
Jumper to + 5V on A3 board. A3U1-37
6 AMPS test -1888 on amps
display
Jumper to + 5V on A3 board. A3U2-37
7 VOLTS input 0-1V For 0 to full scale output voltage. A3U4-2,3,10
8 VOLTS low range TTL high If VOLTS display is below 20 volts
(press DISPLAY SETTINGS).
A3U5-13
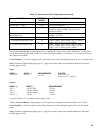
9DISPLAY
SETTINGS
TTL lo If DISPLAY SETTINGS switch on
front panel is depressed.
A3S1,A3R85
10 DISPLAY OVP TTL high If DISPLAY OVP switch on front
panel is depressed.
A3S2,A3R64
11 AMPS input 0-600mV For 0 to full scale output current. A3R56,A3R58
12 -5V -5.0V Derived from -15V bias. A3VR1, A3R90
13 buffered OVP 0-2.2V 1/30 of OVP voltage setting when
DISPLAY OVP switch is depressed
varies with OVP ADJUST pot.
A3U7-7,A3CR5


