


www.aleratec.com
14
Overview
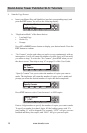
6. Press the “USB” button on the duplicator and set the USB mode to “Off”.
Reboot the duplicator by turning it off and then on again. After the device has
completed the start up process, press the “Print” fast key (also menu option 2)
on the main menu of the duplicator and push the ENT key.
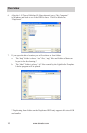
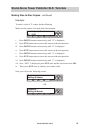
7. The “Please Select Label” menu will appear. The newly created label le will
appear below this prompt within the “label” folder. If there are multiple les,
use the UP and DOWN arrow keys to make your selection. Press the ENT key.
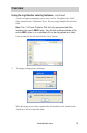
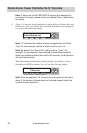
8. Next, the “Counter Selection” menu will prompt you to choose the number
of copies you want to make.
You can select “No Counter” if you prefer to copy
continuously,
or you can select “Specify Counter” to specify the number of
copies (1 to 9999).
Note: See page 27 of this User Guide for instructions on using “No
Counter”, and “Specify Counter”.
When you are satised with the number press the ENT key one more time.
This will eject all of the drives.
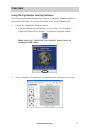
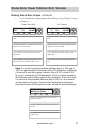
9. Load the drives with LightScribe discs, label side facing down. Close the drive
trays by pressing the drive tray button or lightly pushing the tray to close itself.
The printing process will begin automatically after all of the drives have been
retracted and the discs have been recognized.
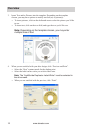
Note: If you would like to manually start printing without waiting for all of
the discs to be recognized, or if you selected “No Counter”, wait until the
device recognizes at least one disc. The display will prompt you to “Go”.
Press the ENT button and the printing process will begin.
10. When the disc printing is complete the drives will automatically eject. If you
are printing additional discs, reload the trays and close them manually to
continue.