


3ware Disk Manager (3DM 2)
64 3ware 9000 Series Serial ATA RAID Controller User Guide
Caution: Before you click Delete Unit, make sure the unit you are
removing is unmounted and no I/Os are being issued. If a unit is
not unmounted and you delete it, it is the equivalent of physically
yanking a hard drive out from under the operating system.
Resulting behavior depends on which operating system you are
using and what kind of I/O is being done, however you will
typically see really bad results, bad errors, and most likely a reset
of the controller or a system hang.
Devices can be unmounted through the operating system. For
details, see the discussion under Remove Unit, above.
Warning: When a unit is deleted, the data will be permanently
deleted: the drives cannot be reassembled into the same unit. If you
want to reassemble the drives on another controller and access the
existing data, use Remove Unit instead of Delete Unit.
After deletion, the operating system is notified that the unit was deleted. In
Linux the device node associated with this unit is removed. In Windows the
Device Manager will reflect the changes under the disk drives icon.
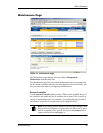
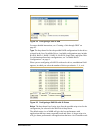
Available Drives (to Create Units)
This section lists the drives on the controller which are not currently
configured as part of a unit. The Port number, model, capacity, and status are
all displayed, as they are for drives in existing units.
Remove Drive. The Remove Drive link removes a drive from the controller
so that you can safely unplug it. Any drive in the Available Drives list can be
removed.
Warning: Physically removing drives which are not in hotswap
carriers can result in a system hang or may even damage the system
and the drive.
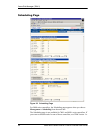
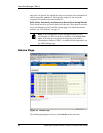
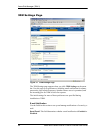
Create Unit
Use the Create Unit button to create a unit for use on the current controller.
Begin by selecting the drives you want to use in the list of Available Drives,
and then click Create Unit. You will be prompted to select the unit Type,
Stripe size (if applicable), Write Cache, and Auto Verify settings.
A window like the one in Figure 24 shows the drives you selected, and lets
you specify configuration settings.