


35
Getting Help
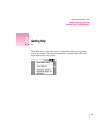
Tips for using Macintosh Guide
Here are a few tips for using Macintosh Guide effectively:
m Macintosh Guide is available only when you are in the Finder—the
desktop area where you can see the icons of disks, folders, and files.
(Other programs may also have help available in the Guide menu,
however.) If you don’t see Macintosh Guide in the Guide menu, pull
down the Application menu (to the right of the Guide menu) and
choose Finder.
m Follow the steps when you’re instructed to; don’t skip ahead or read
ahead. That way the computer can check to make sure you’ve done a
step correctly.
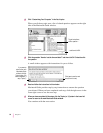
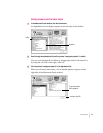
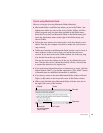
m Unlike most windows, the Macintosh Guide window stays in front of
other windows on the screen so that your instructions are never
covered. If you need to move the Guide window out of the way, drag
it by the title bar at the top of the window.
You can also move the window out of the way by clicking the zoom
box. Click the box once to shrink the window; click it a second time
to expand the window to its original size.
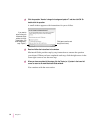
m If you need more information about an instruction or a term, click the
button labeled “Huh?” to get further explanation. (The “Huh?” button
is dimmed when no additional information is available.)
m If you want to return to the main Macintosh Guide window, click the
To pics (or h) button in the lower-left corner of the Guide window.
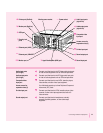
m When you’re finished using Macintosh Guide, click the close box in
the upper-left corner of the window.
Close box
Title bar
Zoom box
Right arrow
Topics button
(On some computers,
it says “Topics.”)
“Huh?” button