


64 Chapter 3
Get a Simple Lighting Kit
Even a high-quality video camera will produce poor results without proper lighting. It’s
unlikely that the normal lighting available will be adequate for shooting a live presentation in
a classroom, for example. At a minimum, you’ll probably want to add back lighting to make
your subject stand out from a dull background.
Lighting is a big subject in and of itself and beyond the scope of this guide. Suffice it to say
that a portable lighting kit supporting three-point lighting (plus a reflector or two if you’re
planning to shoot outside) can greatly improve your results.
Step 5: Set Up Broadcaster
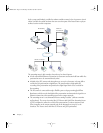
In this example setup, QuickTime Broadcaster is installed on a PowerBook laptop. This
encoding software is included on the Mac OS X Server CD and can also be downloaded free
of charge from the QuickTime Broadcaster web site at
http://www.apple.com/quicktime/products/broadcaster/
To install QuickTime Broadcaster, double-click the installer package
(QuickTimeBroadcaster.pkg) and follow the on-screen instructions.
Once the encoder software is installed, plug the camera into the laptop using FireWire, turn
the camera on, and see if QuickTime Broadcaster recognizes it.
1 Open QuickTime Broadcaster and, if necessary, click the Show Details button.
2 Click the Video tab and choose a video source from the Source pop-up menu.
If the camera is recognized, it will appear in the Source menu and a preview image should
display (if the preview function is on). Video settings should also be active (not dimmed).
If the camera doesn’t appear in the Source menu, quit QuickTime Broadcaster, make sure
your camera is connected and turned on, then open QuickTime Broadcaster again. If your
camera still does not appear, check the QuickTime web site or the Apple Knowledge Base for
information on compatibility and other issues.
When broadcasting to QTSS on a separate computer, as in this example setup, Automatic
Unicast (Announce) is the recommended transmission method. It’s easy to set up.
1 If necessary, click the Show Details button in QuickTime Broadcaster, then click the
Network tab, and choose Automatic Unicast (Announce) from the Transmission pop-up
menu.
2 In the Network pane, enter the IP address or host name of the receiving server (the
Xserve in this example), a name for the broadcast file, the user name and password for
the broadcaster user account on the streaming server created in Step 3, and the buffer
delay (or accept the default).
Note: The buffer delay sets the number of seconds QuickTime buffers the broadcast before
playback. For broadband connections, QuickTime Player 6 or later fills the buffer more
quickly than real-time providing an “Instant-On” viewing experience.
LL0329.book Page 64 Wednesday, November 20, 2002 2:09 PM