


Manual-10
To remove a cue point, use the
x
button on the right side of
the cue point panel.
A cue point can occupy any of the 5 slots. You can drag and
drop cue points to change their order in the list. If you wish to
have the cue points sorted chronologically, check the sort cues
chronologically
option in the setup screen. If you load the
same track on to both decks, you will be able to add or modify
cue points from either deck.
When you press a jump to cue point button while you are
not playing, it plays forward for as long as you hold down the cue
point button, and jumps back to the cue point when you release
the mouse button.
Tip: use the keyboard shortcuts ctrl-comma (for left) and ctrl-
dot
(for right) to place cue points.
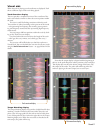
Looping
You can save up to 9 loops per track; these
loops are saved in the file, and will be pres-
ent when you reload the track. To make a
loop, set the in-point by clicking the in button, and the out-point
by clicking the out button. To turn the loop on or off, click the
loop button. If you want the playhead to jump to the start of the
loop when you enable the loop, hold the control key and press
the loop button.
To adjust the in-point of the loop, click the in button. You
can use the arrow keys: to move the in-point towards the
start of the track, to move the in-point towards the end of the
track. Hold down the shift key while pressing the arrow key to
make coarse adjustments. Click the in button again to save the
in-point. e same applies to adjusting the out-point.
ere are 9 available loop slots per track. If a loop is set in
a given slot, the background (behind the loop number) will be
green. Press the x button to clear the loop. If you click on the
number of a occupied loop slot, a red border will appear. is
indicates the loop is locked, and you will not be able to adjust the
end points or delete the loop until you unlock it, by clicking on
the number again.
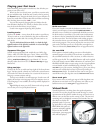
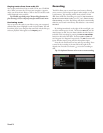
Autoplay
Click the auto button to enable autoplay.
With this setting turned on, when one track nishes playing, the
next track starts automatically. Load from a crate to play through
the songs in that crate, or from your library to play through your
library. Use the next
| and previous |
buttons to jump to
the next track or go to the previous track in the list. Play from
start
must be checked in the setup screen.
Repeat
Use the repeat function to repeat the song.
Tip: Short “loop” samples can be turned into a continuous
track using repeat function. e loops need to be less than 10
seconds long, and cut at the start and end of a bar.
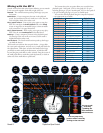
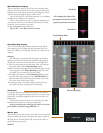
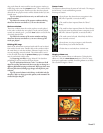
Tap Tempo
For tracks with no BPM information, there is a tap tempo button
displayed where the BPM usually is, in the song info area.
Pressing alt-space bar activates the tempo tapper (press alt-
space bar
a second time to activate the tempo tapper on the right
Virtual Deck). Tap the space bar along with the beat.
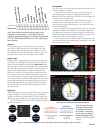
After you’ve tapped the rst beat, you can switch to double
time tapping, half time, start of each bar etc. e range is set by
the first two taps, after that you can switch to any steady rhythm
you feel comfortable with – quarter notes, half note, whole notes.
Esc resets the BPM, Enter saves the BPM to the track. You can use
the mouse if you prefer.
Your CD player or turntable’s pitch slider doesn’t need to
be at zero, we do the math for you. You can also use the tempo
tapper when no song is loaded, for nding the BPM of regular
records, for example.