


ASUS RS120-E3/PA4ASUS RS120-E3/PA4
ASUS RS120-E3/PA4ASUS RS120-E3/PA4
ASUS RS120-E3/PA4
6-36-3
6-36-3
6-3
6.1.26.1.2
6.1.26.1.2
6.1.2
Installing hard disk drivesInstalling hard disk drives
Installing hard disk drivesInstalling hard disk drives
Installing hard disk drives
The system supports two hot-swap Serial ATA hard disk drives for RAID
configuration.
By default, the SATA hard disk drives are connected to the motherboard
SATA1 (Port0) and SATA3 (Port1) connectors via the SATA backplane and
SATA cables.
Refer to sections
1.5 Internal components 1.5 Internal components
1.5 Internal components 1.5 Internal components
1.5 Internal components and
2.4 Hard disk drives2.4 Hard disk drives
2.4 Hard disk drives2.4 Hard disk drives
2.4 Hard disk drives
for details on SATA hard disk drive connection and installation.
For optimal performance, install identical drives of the same model and capacity
when creating a disk array.
6.1.36.1.3
6.1.36.1.3
6.1.3
Setting the RAID item in BIOSSetting the RAID item in BIOS
Setting the RAID item in BIOSSetting the RAID item in BIOS
Setting the RAID item in BIOS
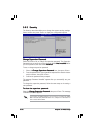
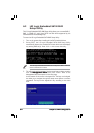
You must set the RAID item in the BIOS Setup before you can create a RAID
set from SATA hard disk drives attached to the SATA connectors supported
by the Intel
®
ICH7R Southbridge chip. To do this:
1. Enter the BIOS Setup during POST.
2. Go to the
Main MenuMain Menu
Main MenuMain Menu
Main Menu, select
IDE ConfigurationIDE Configuration
IDE ConfigurationIDE Configuration
IDE Configuration, then press <Enter>.
3. Set the
ATA/IDE Configuration ATA/IDE Configuration
ATA/IDE Configuration ATA/IDE Configuration
ATA/IDE Configuration item to [Enhanced Mode], then press
<Enter>.
4. Set the
Configure SATA As Configure SATA As
Configure SATA As Configure SATA As
Configure SATA As item to [RAID].
5. Set the
Onboard SATA RAID ROMOnboard SATA RAID ROM
Onboard SATA RAID ROMOnboard SATA RAID ROM
Onboard SATA RAID ROM item to [Enabled]. Otherwise, the
RAID configuration utility won’t appear during POST.
6. Save your changes, then exit the BIOS Setup.
Refer to Chapter 5 for details on entering and navigating through the BIOS
Setup.
6.1.46.1.4
6.1.46.1.4
6.1.4
RAID configuration utilityRAID configuration utility
RAID configuration utilityRAID configuration utility
RAID configuration utility
Depending on the RAID_SEL1 jumper setting and the operating system, you
can select a utility to create a RAID set. Refer to section 4.2 Jumpers for
details on the RAID_SEL1 jumper settings.
Use the
LSI Logic Embedded SATA RAID Setup Utility LSI Logic Embedded SATA RAID Setup Utility
LSI Logic Embedded SATA RAID Setup Utility LSI Logic Embedded SATA RAID Setup Utility
LSI Logic Embedded SATA RAID Setup Utility to create a
RAID 0, RAID 1, or RAID 0+1 under Windows
®
2000/2003 Server/XP or
Red Hat
®
Enterprise ver. 3.0 operating system.
Use the
IntelIntel
IntelIntel
Intel
®®
®®
®
Matrix Storage Manager Matrix Storage Manager
Matrix Storage Manager Matrix Storage Manager
Matrix Storage Manager to create a RAID 0, RAID 1, RAID
0+1, or software RAID 5 under Windows
®
2000/2003 Server/XP operating
system.
Refer to the succeeding sections for details on how to use the RAID
configuration utilities.