


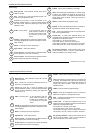

Location and Functions of Control
5-6
Location and Functions of Control
5975696 BARCODATA 2100 140798
5975696 BARCODATA 2100 140798
5-6
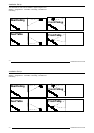
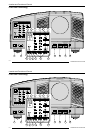
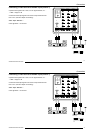
Terminology
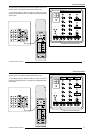
Back light key : when activated, all keys will lit up and
visible in the dark.
ADJ. : ADJUST key, to enter the adjustment mode or for
quick exit in the adjustment mode.
Address key (sunk key), to enter the address of the
projector (between 0 and 9). Press the recessed address
key with a pencil, followed by pressing one digit button
between 0 and 9.
STBY : stand by button - to start projection when the
power switch is switched on.
- to switch off the projector with-
out switching off the power
switch.
PAUSE : to stop projection for a short time, press 'PAUSE'.
The image disappears but full power is retained for imme-
diate restarting.
MUTE : to interrupt the sound reproduction.
PHASE : used to remove instability of the image.
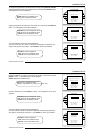
TEXT : when adjusting one of the image, e.g. controls during
a meeting, the displayed bar scale can be removed by
pressing 'TEXT' key first. To re-display the bar scale on the
screen, press 'TEXT' key again. 'TEXT' key only active in
operational mode.
FREEZ : press to freeze the projected image.
ENTER : to start up the adjustment mode or to confirm an
adjustment or selection in the adjustment mode.
EXIT : to leave the adjustment mode or to scroll upwards
when in the adjustment mode.
Control Disk : To make menu selections when in the
adjustment mode. Also allows to increment or decrement an
adjustment in the adjustment mode.
Control Disk Up = up arrow in the menus
Control Disk Down = down arrow in the menus
Control Disk to the Right = arrow to the right on the menus
Control Disk to the Left = arrow to the left on the menus
RC operating indication : lights up when a button on the
remote control is pressed. (This is a visual indicator to
check the operation of the remote control)
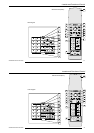
1
2
3
10
4
5
6
7
8
9
11
12
13
14
15
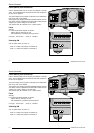
Digit buttons : direct input selection.
Sound controls : use these buttons to obtainthe desired
sound reproduction (see also 'Controlling').
Picture controls : use these buttons to obtain the desired
picture analog level (see also 'Controlling').
16
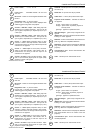
Terminology
Back light key : when activated, all keys will lit up and
visible in the dark.
ADJ. : ADJUST key, to enter the adjustment mode or for
quick exit in the adjustment mode.
Address key (sunk key), to enter the address of the
projector (between 0 and 9). Press the recessed address
key with a pencil, followed by pressing one digit button
between 0 and 9.
STBY : stand by button - to start projection when the
power switch is switched on.
- to switch off the projector with-
out switching off the power
switch.
PAUSE : to stop projection for a short time, press 'PAUSE'.
The image disappears but full power is retained for imme-
diate restarting.
MUTE : to interrupt the sound reproduction.
PHASE : used to remove instability of the image.
TEXT : when adjusting one of the image, e.g. controls during
a meeting, the displayed bar scale can be removed by
pressing 'TEXT' key first. To re-display the bar scale on the
screen, press 'TEXT' key again. 'TEXT' key only active in
operational mode.
FREEZ : press to freeze the projected image.
ENTER : to start up the adjustment mode or to confirm an
adjustment or selection in the adjustment mode.
EXIT : to leave the adjustment mode or to scroll upwards
when in the adjustment mode.
Control Disk : To make menu selections when in the
adjustment mode. Also allows to increment or decrement an
adjustment in the adjustment mode.
Control Disk Up = up arrow in the menus
Control Disk Down = down arrow in the menus
Control Disk to the Right = arrow to the right on the menus
Control Disk to the Left = arrow to the left on the menus
RC operating indication : lights up when a button on the
remote control is pressed. (This is a visual indicator to
check the operation of the remote control)
1
2
3
10
4
5
6
7
8
9
11
12
13
14
15
Digit buttons : direct input selection.
Sound controls : use these buttons to obtainthe desired
sound reproduction (see also 'Controlling').
Picture controls : use these buttons to obtain the desired
picture analog level (see also 'Controlling').
16