


SmartSwitch 9A100 User Guide 3-1
3 IP OVER ATM AND LANE
This chapter describes working with the SmartSwitch 9A100 IP over ATM VLAN and emulated LAN capabilities. At
the end of this chapter you will be able to use your SmartSwitch 9A100 switch to
• Create an IP over ATM VLAN
• Create an emulated Ethernet LAN (LANE)
3.1 CREATING AN IP OVER ATM VLAN
This section describes implementing IP over ATM on your SmartSwitch 9A100 switch. The following assumptions
are made:
• The SmartSwitch 9A100 switch will have a client on the IP over ATM VLAN
• The ARP server will reside on the switch and correspond to the address of the switch client
• All end nodes (computers, edge devices, and so on) support Switched Virtual Circuits (SVCs)
1. Log into the switch, either through the terminal port or through the Ethernet interface by telnet.
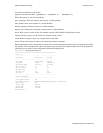
2. Create a client on the switch and assign it as the ARP server for the VLAN.
SmartSwitch # add ipatmclient
ClientNumber(0) : 1
ServerType(NONE) : local <
the ARP server is assigned to the switch client
ServerAddress() :
IPAddress() : 90.1.1.1 <
IP address is for example only
NetMask(255.0.0.0) : 255.255.255.0 <
subnet mask is for example only
MTU(9180) :
SmartSwitch #
The example above creates a client on the switch, designates the client as the ARP server for the VLAN
(
ServerType = local), and assigns the client an IP address and subnet mask.
Note The command add ipatmclient always prompts you with a subnet mask that is
appropriate for the IP address. However, if necessary, you can change the subnet
mask to correspond to the strategy employed within your networks.
Note Never create an IP over ATM VLAN (or an IP over ATM client) with the same
subnet as the SmartSwitch 9A100 Ethernet port.