


9
Chapter 2: Setting up the Hardware
Step 2: Install the Ethernet Links
Getting Started Guide
Chapter
2
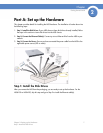
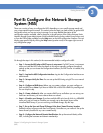
7. If the NSS is rack mounted, attach the mounting ears to both sides of the NSS. Attach the
mounting ears to either side of the rack.
8. Continue with Step 2 to install the Ethernet cable(s).
Approved Vendor List for Drives
If you are purchasing disk drives to install in the NSS, refer to the product support information
offered on the Linksys website (www.linksys.com) for a list of recommended disk drives.
When you select a disk drive, consider the type of RAID levels required to service your business
needs. For example, if you are creating a RAID (versus a JBOD), make sure that each of the disks
used in the array have the same disk capacity. The RAID is built using the capacity of the smallest
disk in the array.
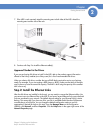
Step 2: Install the Ethernet Links
After the disk drives are installed in the chassis, you are ready to connect the Ethernet cables. You
can connect up to two Ethernet links to the NSS. If you have a second Ethernet link, ensure that both
links are connected to your network. The default network setting for your Ethernet link(s) is Active
Backup. This means that if you have two links, one link is available should the other link become
unusable due to a link failure. You can change the default configuration setting to use link
aggregation if desired (for help on this topic, from the Manager Menu on the configuration
interface, click Network, and then Properties. Click the Help button in the upper-right corner of the
Network Properties page.