


29
Chapter 3: Configuring the Network Storage System
(NSS)
Getting Started Guide
Chapter
3
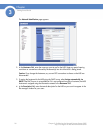
Step 9: Create any Locally Defined Users and Groups
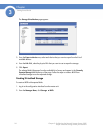
You can create, view, and maintain the list of users who can access the NSS. The Configured Users
page displays the Configured Users table. This table lists each defined user whether the user was
created locally via the NSS configuration interface or imported from an NTv4, Active Directory, or
NIS domain. Note that users not created locally via the NSS are read-only. Once a user profile is
created, you cannot rename the username. To rename an existing user profile, delete the user profile
and then create a new one. User profiles are maintained by the administrator. Users cannot make
changes to their passwords.
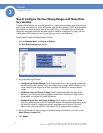
Groups are an easy way to manage users with the same storage needs and privileges. A group
consists of one or more users. You can add or remove users from a group at any time. The user's
primary group (the group to which quota charges for storage usage are applied) is set up in the
Primary Group field of the user's profile. A group called “nasusers” is automatically created when
you first install the NSS. This group is the default primary group when you create new users.
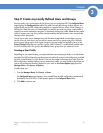
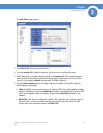
Creating a User Profile
Depending on your network setup, you might administer users and groups locally or via the domain
controller. The NSS configuration interface gives you read-only access to users and groups provided
by NTv4, Active Directory, or NIS domains. You can also create and manage local users from the
NSS configuration interface. Before you can create a user profile, you must configure the volume you
want to use as the home directory location for your users on the Access Options page (from the
Manager Menu, click Access
Options).
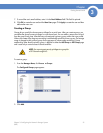
To add a local user:
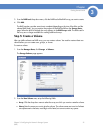
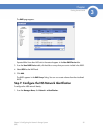
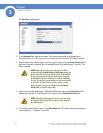
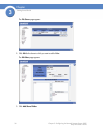
1. From the Manager Menu, click Access Users.
The Configured Users page appears. Users created from the NSS configuration interface and
provided by the ADS, NTv4, or NIS domain appear in the Configured Users table.
2. Click Add to create a user.