


4
Chapter 1: Introduction
Recommended Installation Sequence
Getting Sarted Guide
Chapter
1
Recommended Installation Sequence
Follow the NSS installation steps to set up and configure the device. They provide out-of-the-box
instructions. You can find detailed instructions for each step in the remaining sections of this guide.
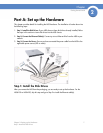
• Part A: Set up the hardware:
- Step 1: Install the disk drives. Skip this step if you have an NSS4100 or NSS6100 as they
are already equipped with disk drives.
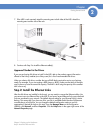
- Step 2: Connect the Ethernet cable(s).
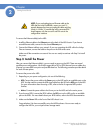
- Step 3: Connect the power.
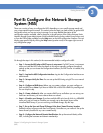
• Part B: Configure the NSS:
- Step 1: Configure the Network Settings IF a DHCP server is not present. (If there is a DHCP
server, skip this step.)
- Step 2: Log into the Configuration Interface
- Step 3: Configure the Time setting (options include NTP or manual).
- Step 4: Configure the RAID(s). You can choose to skip this step if you have an NSS4100 or
NSS6100 as it is preconfigured with a RAID5 array.
- Step 5: Create the volume(s).
- Step 6: If you have multiple NSS units (one of which is a NSS6000 series unit), and you
want to virtualize your storage, set up the export/import of the virtualized RAID arrays.
- Step 7: Set up the User and Group ID ranges and the users’ home directory location (this
enables the import of groups/users from Domain Controllers and to create local users and
groups).
- Step 8: Configure the Network Domain Identification (NT4, Active Directory, NIS, etc.) to
join the NSS to a domain.
- Step 9: Add any locally defined groups or users. (Optional)
- Step 10: Create share(s) and enable access to these shares (i.e., CIFS, NFS, FTP). You can
also define the DFS access.
- Step 11: If you have an NSS6000 series unit, configure the volume snapshots. (Optional)
- Step 12: Configure the share backups. (Optional)