


5-13
Cisco 7600 Series Ethernet Services Plus Line Card Hardware Installation Guide
OL-16146-10
Chapter 5 Installing and Removing SFP and XFP Modules
Removing and Installing XFP Modules
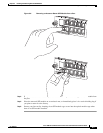
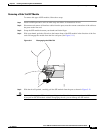
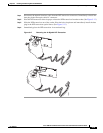
Step 3 Position the XFP transceiver in front of the XFP socket opening on the module. Slide the XFP transceiver
part of the way into the transceiver socket on the system module front panel.
Step 4 Remove the optical bore dust plug from the XFP transceiver.
Step 5 Pivot the bale clasp up so that it is parallel with the transceiver body. (See Figure 5-15.)
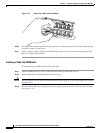
Step 6 Continue sliding the XFP transceiver into the socket until the XFP transceiver is mated with the
transceiver socket connector.
Step 7 Latch the XFP transceiver in the transceiver socket by pivoting the bale clasp down so that the bale clasp
is perpendicular to the transceiver body. (See Figure 5-15.)
Caution If the latch is not fully engaged, you may accidentally disconnect the XFP transceiver.
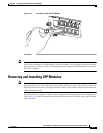
Step 8 Immediately reinstall the dust plug in the XFP transceiver optical bores. Do not remove the dust plug
until you are ready to attach the network interface cable.
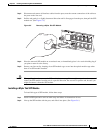
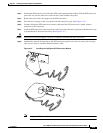
Figure 5-15 Installing the 10-Gigabit XFP Transceiver Module
Note 10-Gigabit XFP transceivers are keyed to prevent incorrect insertion.
7600-ES+2TG3C
XL
ETHER
N
ET SE
R
VI
CES
M
ODULE
ST
A
TUS
EXT
CL
K
C
LASS
1
L
A
S
E
R
A/L
1
7600
-E
S
+
2TG
3CXL
ETH
ERN
E
T
SE
R
VI
CES
M
ODULE
ST
A
TUS
EXT
CL
K
C
LA
SS
1
L
A
S
E
R
A/L
1
280866