


Chapter 5
Configuration Using the Web-based Utility
19
24/48-Port 10/100 + 4-Port Gigabit Smart Switch with Resilient Clustering Technology and PoE
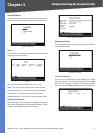
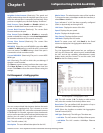
System Location This is used to enter a description of
where the Switch is physically located, such as 3rd Floor.
System Contact Enter the name of the administrator
responsible for the system.
System Object ID This is used for SNMP purposes and is
set to 1.3.6.1.4.1.3955.6.5.224(248).2.
Base MAC Address
Displays the Switch’s physical address
.
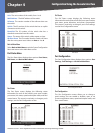
IP Configuration
Management VLAN This drop-down menu allows you to
select the Management VLAN. The default value is 1.
WARNING: If the system IP address (IP Address
field) is set to 192.168.1.254, then keep the
default values for the Management VLAN field
(default value: 1), and the Default Gateway
field (default value: 0.0.0.0). These fields must
remain set to the default values. Otherwise, you
may not be able to access the system.
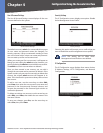
IP Address Mode Specifies whether the Switch’s IP
address is Static or dynamically assigned using DHCP
(Dynamic Host Configuration Protocol). Selecting Static
allows you to enter a static IP address, subnet mask and
default gateway using the text field provided. The default
setting is Static.
IP Address If you are using a static IP address, enter
the IP address here. The Switch’s default IP address is
192.168.1.254.
Subnet Mask If you are using a static IP address, enter
the subnet mask for the currently configured IP address.
The default subnet mask is 255.255.255.0.
Default Gateway If you are using a static IP address,
enter the IP address of the default gateway. The default
value is 0.0.0.0.
DNS Server If you are using a static IP address, enter the
IP address of the DNS server. A second DNS address can be
specified in the additional text field provided.
Click Save Settings to save your changes. Click Cancel
Changes to cancel your changes.
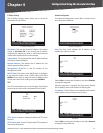
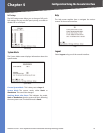
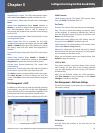
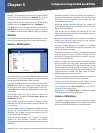
Setup > Time
The Time screen allows you to configure the time settings
for the Switch.
Setup > Time
Set Time
Use System Time Select this option to use the system
date and time.
Use SNTP Time Select this option to use a Simple Network
Time Protocol (SNTP) server to set the date and time.
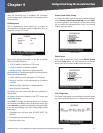
Local Time
Here you set the system date and time for the Switch. All
settings noted as “two-digit” must contain a leading zero if
the value is less than 10 (for example, 01 instead of 1).
Hours Enter the two-digit hour here.
Minutes Enter the two-digit minutes here.
Seconds Enter the two-digit seconds here.
Month Enter the two-digit month here.
Day Enter the two-digit day here.
Year Enter the last two digits of the year here (for example,
07 instead of 2007).
Time Zone Select your time zone from the drop-down
menu. Time zones are identified by the difference between
Greenwich Mean Time (GMT) and local time.
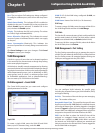
Daylight Saving
This is where you configure Daylight Saving Time.
Daylight Saving To enable daylight saving time, check
the box, then select either USA or European to use US
or European daylight saving time, respectively. To use a
different type of daylight saving time, select Custom, then
customize the following settings:
Time Set Offset Enter the time difference in minutes
for daylight saving time. The default is 60 minutes.
From Enter the starting date for daylight saving time
using the format DD/MM/YY.
To Enter the ending date for daylight saving time
using the format DD/MM/YY.
•
•
•