


Chapter 5 Configuring the Internal Ethernet Adapter for TCP/IP
152
4. Transfer the compressed tar file from the media onto the host:
tar xvf /dev/
devicename
devicename
is usually fd0 for a diskette.
5. Uncompress this file. Enter:
uncompress npdist.tar.1.Z
6. Untar the file. Enter:
tar xvf pndist.tar.1
A list of files displays and scrolls up the screen as tar executes and
several file and sub-directories are created.
7. Assign an IP address and IP name to the Internal Ethernet Adapter
in your host table (/etc/hosts, hosts nis map, or DNS name
tables).
8. Run ezsetup or npconfig. Enter:
./ezsetup or ./npconfig
NOTE: If running the host software on an HP-UX
®
system, you will
need to explicitly set the Korne shell by adding “ksh” before
./ezsetup or ./npconfig.
9. Enter the number for Configure New Unit from the Main Menu.
10. Follow the prompts.
For more information, see ezsetup and npconfig on page 147.
Configuration Through the Network with ARP
To configure the Internal Ethernet Adapter using the network, go to a
host terminal and do the following:
1. Log on to your system as root user.
2. Assign an IP address and an IP name to the Internal Ethernet
Adapter in your host table (/etc/hosts, hosts nis map, or DNS
name tables).
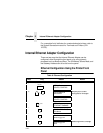
3. Find the Ethernet address for the Internal Ethernet Adapter on the
bottom of the unit. It must be entered as part of this procedure.
4. Use the arp command to add an entry in the host's arp table. The
following is the most common syntax for this command:
arp -s
ipname ethernetaddress
Where
ipname
is the Internal Ethernet IP name or IP address and
ethernetaddress
is that of the Internal Ethernet Adapter.