


Chapter 5 Configuring the Internal Ethernet Adapter for Windows
188
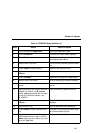
Internal Ethernet Adapter IP Address and Netmask
Configuration
Since TCP/IP is being utilized, the Internal Ethernet Adapter’s
configuration involves storing an IP address and a netmask. To
configure the Internal Ethernet Adapter with its network settings, follow
the steps below:
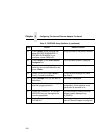
1. Find the Ethernet address for the Internal Ethernet Adapter on the
bottom of the unit. It must be entered as part of this procedure.
2. Select an IP address for the Internal Ethernet Adapter.
3. Open a DOS window.
4. Use the arp command to add an entry to the host’s arp table.
arp -s
ipaddress ethernetaddress
5. telnet to the Print Server. This will bring up a login screen.
telnet
ipaddress
6. Log into the unit as root.
7. At the password prompt, press <Enter>. No password is required
at this point as the Internal Ethernet Adapter is still unconfigured.
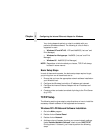
NOTE: The following WARNING message will appear. It is not
important at this time:
STORED AND CURRENT VALUES DIFFER
You should now see a prompt displayed that has the Internal Ethernet
Adapter’s IP address followed by a colon, then root.
ipaddress
:root>
8. Store the new IP address and netmask in EEPROM so that the
Internal Ethernet Adapter can remember its configuration after
reboots. Enter:
store net
ifnum addr ipaddress
store net
ifnum mask netmask
NOTE: The
ifnum
will always be (1) since there is only one network
interface, ethernet.
9. Verify the IP address and netmask. Enter:
list stored net
10. Log out of the Telnet session with quit. Then reboot the Internal
Ethernet Adapter by powering the unit off, then on. This will reset
the unit and apply the changes to the stored settings.