


PSERVER Setup (Pre-NetWare 4)
175
PSERVER Setup (Pre-NetWare 4)
This procedure configures the Novell file server to use an Internal
Ethernet Adapter as a PSERVER in a non-NetWare 4 environment.
Please see “NetWare 4 Options” on page 180 for more on a NetWare 4
setup.
NOTE: The Internal Ethernet Adapter replaces a dedicated
workstation running PSERVER.EXE or PSERVER.NLM on the
file server, so these are no longer needed.
To set up the unit as a PSERVER in a non-NetWare 4 environment,
follow the procedure outlined in Table 11.
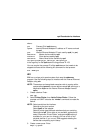
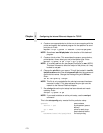
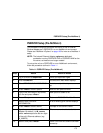
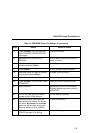
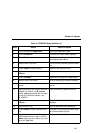
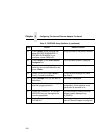
Table 11. PSERVER Setup (Pre-NetWare 4)
Step Action Result of Action
1. Log in to Novell as supervisor. Gives you supervisor rights.
2. Enter PCONSOLE. PCONSOLE's Main Menu displays.
3. Select PRINT QUEUE INFORMATION. List of currently-defined queues comes
up.
4. Press <Insert> to add a queue. Asks for new queue's name.
5. Type in this new name in any format
you like and press <Enter>.
New queue is added to list.
6. Press <Escape>. Returns to PCONSOLE's Main Menu.
7. Select PRINT SERVER
INFORMATION.
A list of existing print servers displays.
8. Press <Insert> to add a server. Prompts for the server's name.
9. Type the name of the Internal Ethernet
Adapter. By default, it is M_
xxxxxx
where
xxxxxx
equals the last six digits
of the unit's Ethernet address. (e.g.
M_000BF5)
This new server is added to the list.
10. Select it and press <Enter>. PRINT SERVER INFORMATION menu
comes up.