


Scanning
Scanning
23
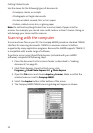
6 Optionally, you can select the Preview button. This will perform a quick
preview scan of your document. Once the preview is complete, you can
move and size the dashed box to select the exact area of the document
you wish to scan. You can make other adjustments to the scan settings at
this time as well.
7 If you performed a preview scan, remember to replace your original
document back into the scanner feeder.
8 Push the Scan button on the TWAIN dialog to perform the scan.
Large scan areas and/or resolutions above 300 DPI require additional memory
and disk space, and will take longer to process. To minimize this, use the Preview
button first. Select only the area you need to scan, and don’t use a resolution
above 300 DPI unless you require it.
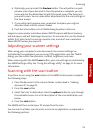
Adjusting your scanner settings
When using your computer to scan documents, the scanner settings are
controlled by the application you are using. If the application uses the TWAIN
dialog, you can control the resolution, contrast, brightness, and more.
When scanning with the A4000 scan button, your scan settings are controlled by
the A4000 settings utility. See “Using the settings utility” on page 11 for more
information.
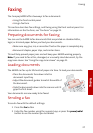
Scanning with the scan button
To perform a scan using the scan button on the A4000 control panel, complete
the following steps:
1 Place the document in the scanner feeder, as described in “Loading
documents” on page 21.
2 Press the scan button.
3 Select the Scan To destination. Press the options button to cycle through
the available choices. For a full description of the scan destinations, see
below.
4 Press the start button.
The A4000 will then contact your PC and perform the scan.
You can scan to a folder, scan to email, or scan to an application, as explained in
the following sections.