S260-75-1
21
!
SAFETY
FOR LIFE
No Preference Operation
1. Set CONTROL MODE switch S5 to the TEST posi-
tion. This will remove the control from service and
allow operation without operating the high-voltage
transfer switches.
2. Check the setting of the SOURCE PREFERENCE
switch (S4). It should be in the center No Preference
position.
3. Check LATCH RELAY STATUS TEST terminals (T-1,
T-2) to ground (T-3). 120 Vac at T-1 indicates the con-
trol is in the Source I mode. 120 Vac at T-2 indicates
the control is in the Source II mode.
4. Remove source voltage by unscrewing one of the
phase fuses from Source I if T-1 is energized or from
Source II if T-2 is energized. If a Source I fuse is
removed, the PREFERRED TO ALTERNATE TIMER
will start. If a Source II fuse is removed, the ALTER-
NATE TO PREFERRED TIMER will start.
5. When the timer runs out, the latch relay (R1) will
transfer as indicated by a transfer of the 120 Vac sig-
nal at the test terminals.
6. Replace the removed fuse to re-energize the power
source. No timers will start and latch relay (R1) will
not transfer.
7. Unscrew one of the phase fuses from the other
source. If a Source II fuse is removed, the ALTER-
NATE TO PREFERRED TIMER will start. If a Source
II phase fuse is removed, the PREFERRED TO
ALTERNATE TIMER will start.
8. When the timer runs out, the latch relay (R1) will
transfer back to its original operating position, again
indicated by a transfer of the 120 Vac signal at the
test terminals.
9. Replace the removed fuse to re-energize the power
source. No timers will start and latch relay (R1) will
not transfer.
10. Place the CONTROL MODE switch (S5) to the normal
position. If switch S5 is left in the TEST position, the S
control will be inoperative on automatic operation.
Indicating Lamps
Although not essential to control operation, the indicating
lamps provide useful operating information. All lamps are
120 Vac operated half-wave through diodes.
For a quick check of the lamp diodes, depress the LAMP
TEST switch, S6. The two OPEN and two CLOSE lamps
should glow with equal brilliance, the green appearing
slightly less intense, and the SOURCE I ENERGIZED
and SOURCE II ENERGIZED lamps should noticeably
increase in brilliance (these lamps are energized from
two phases, 120 degrees apart, instead of a single bus).
Note: The OPEN lamp circuit includes the impedance of
the close coil or motor of the high-voltage switch
actuator.
Verification of Fuses
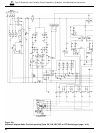
Fuses can be checked on the front panel of the control.
If the fuses are blown and require replacement, the white
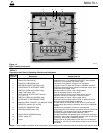
buttons on the front panel will show. Refer to item 15 in
Figure 13 and Table 4.
Advanced Troubleshooting
Use the output of the control procedure to determine if
the problem lies in the control or the high-voltage switch-
es. If the conditions of the output procedure are satisfac-
tory, test the high-voltage switch. If the conditions of the
output procedure are unsatisfactory, test the manual con-
trol functions. If the conditions of the manual control func-
tions procedure are satisfactory, test the automatic con-
trol functions.
IMPORTANT: The control should be removed from
service prior to conducting the advanced troubleshoot-
ing procedures.


