


Solving Problems 43
Solving Problems
Dell Diagnostics
CAUTION: Before you begin any of the procedures in this section, follow the safety instructions
located in the Product Information Guide.
When to Use the Dell Diagnostics
If you experience a problem with your computer, perform the checks in this chapter and run the
Dell Diagnostics before you contact Dell for technical assistance.
NOTICE: The Dell Diagnostics works only on Dell™ computers.
The Dell Diagnostics is located on a hidden diagnostic utility partition on your hard drive.
NOTE: If your computer cannot display a screen image, contact Dell (see page 92).
1
Shut down the computer.
2
Connect the computer to an electrical outlet.
3
Turn on the computer. When the DELL™ logo appears, press <F12> immediately.
NOTE: If you cannot see anything on your display, hold down the mute button and press the
computer’s power button to begin the Dell Diagnostics. The computer automatically runs
the Pre-boot System Assessment.
If you wait too long and the operating system logo appears, continue to wait until you see the
Microsoft
®
Windows
®
desktop. Then shut down your computer and try again.
4
When the boot device list appears, highlight
Diagnostics
and press <Enter> to start the
Dell Diagnostics from the diagnostics utility partition on your hard drive.
Dell Diagnostics Main Menu
1
After the Dell Diagnostics loads and the
Main
Menu
screen appears, click the button for the
option you want.
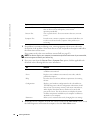
Option Function
Express Test Performs a quick test of devices. This test typically takes
10 to 20 minutes and requires no interaction on your part.
Run Express Test first to increase the possibility of tracing the
problem quickly.