


Installing System Components 97
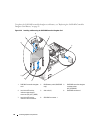
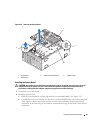
Installing the Control Panel Assembly
1
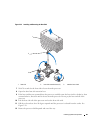
Insert the control panel assembly display module into the chassis cutout and secure with the two Torx
screws.
2
Affix the control panel label to the display module.
3 Install the control panel board in the system chassis and secure with the three Phillips screws. See
Figure 3-27
.
4 Connect the display module cable to the control panel board. See
Figure 3-27
.
5 Connect the control panel cable to the control panel board. See
Figure 3-27
.
6 Close the system. See
"Closing the System" on page 48
.
7
If applicable, reinstall the top panel on your tower system:
a
Place the top panel on top of the system and offset slightly so that the panel can engage the chassis
hooks.
b
Slide the panel forward to closed position.
c
Install the retaining screw to the top back of the system.
8
Reconnect the system to the power source and turn on the system and attached peripherals.
9
Replace the front bezel, if removed. See "Installing the Bezel" on page 47.
System Board (Service-Only Procedure)
Removing the System Board
CAUTION: Only trained service technicians are authorized to remove the system cover and access any of the
components inside the system. See your Product Information Guide for complete information about safety
precautions, working inside the computer, and protecting against electrostatic discharge.
CAUTION: Whenever you need to lift the system, get others to assist you. To avoid injury, do not attempt to lift the
system by yourself.
1 Remove the front bezel, if attached. See
"Removing the Bezel" on page 46
.
2
Turn off the system and attached peripherals, and disconnect the system from the electrical outlet.
3
Detach all cables from the front and rear of the system
4 Open the system. See
"Opening the System" on page 48
.
5
Disconnect any cables attached to expansion cards in the expansion-bay bracket.
6 Remove all of the cooling fans. See
"Removing and Installing a Fan" on page 53 and "Removing and
Installing the Cooling Shroud Fan" on page 54
.
7
Remove the memory cooling shroud. See "Removing the Cooling Shroud" on page 77.
8 Remove the center and rear fan brackets. See
"Removing the Center Fan Bracket" on page 79
and
"Removing the Back Fan Bracket" on page 80
.