


9. When you have completed running diagnostics, remove the Drivers and Utilities CD.
10. When the computer restarts, press as soon as the Dell logo screen appears, and before the Microsoft Windows logo screen appears.
11. In the system setup program, press until you locate the page with the Boot menu.
12. Reset the boot sequence so that the device noted in step 6 boots first.
13. Press to exit the system setup program and restart Microsoft Windows.
14. Remove the CD from the drive.
When you start the diagnostics, the Dell logo screen appears, followed by a message telling you that the diagnostics is loading. After the diagnostics loads,
the Diagnostics Menu appears.
To select an option from this menu, highlight the option and press , or press the key that corresponds to the highlighted letter in the option you
choose.
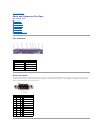
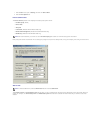
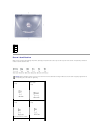
Diagnostics Menu
For a quick check of your computer, select Quick Tests from the Test All Devices or Test One Device option. Quick Tests runs only the subtests that do not
require user interaction and that do not take a long time to run. Dell recommends that you choose Quick Tests first to increase the odds of tracing the source
of the problem quickly.
For a thorough check of your computer, select Extended Tests from the Test All Devices option.
To check a particular area of your computer, select Extended Tests from the Test One Device option, or select the Advanced Testing option to customize your
test(s).
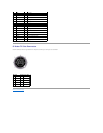
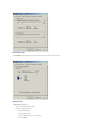
Advanced Testing
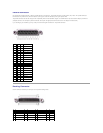
When you select Advanced Testing from the Diagnostics Menu, the following screen appears, listing the diagnostic test device groups and devices of the
selected device group, and it allows you to select categories from a menu. Press the arrow keys or to navigate the screen.
Advanced Testing Main Screen
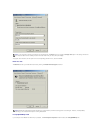
Information in the Advanced Testing screen is presented as follows:
l On the left side of the screen, the Device Groups area lists the diagnostic test groups in the order they will run if you select All from the Run tests
menu category. Press the up- or down-arrow key to highlight a test device group.
l On the right side of the screen, the Devices for Highlighted Group area lists the computer's currently detected hardware and some of the relevant
settings.
l Two lines at the bottom of the screen make up the menu area (see "Advanced Testing Help Menu"). The first line lists the categories you can select;
press the left- or right-arrow key to highlight a menu category. The second line gives information about the category currently highlighted.
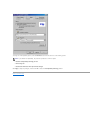
Advanced Testing Help Menu
For more information on using the Advanced Testing option:
1. Press .
2. Highlight the Help category and press , or press the key that corresponds to the highlighted letter in the category you choose.
Advanced Testing Help Categories
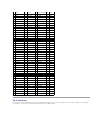
Option
Function
Test All Devices
Performs extensive diagnostic tests or quick diagnostic tests on all devices.
Test One Device
Performs extensive diagnostic tests or quick diagnostic tests on one device after you select it from a list of device groups. After you
select Test One Device, press for more information about a test.
Advanced Testing
Allows you to modify the parameters of a test and select a group of tests to perform. You can access online Help for more information
about Advanced Testing.
Information and
Results
Provides test results, test errors, version numbers of the subtests used by the Dell Diagnostics, and additional help on the Dell
Diagnostics.
ProgramOptions
Allows you to change the settings of the Dell Diagnostics.
Exit to MS-DOS
Exits to the MS-DOS®prompt.
HINT: The test groups reflect the configuration of your computer.