


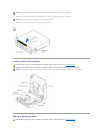
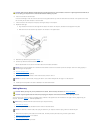

10. Insert the card into the card connector.
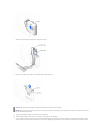
If the card is full-length, insert the end of the card into the card guide bracket as you lower the card toward its connector on the system board. Insert
the card firmly into the card connector on the riser board.
11. Lower the retention arm and press it into place, securing the card(s) in the computer.
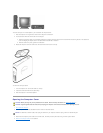
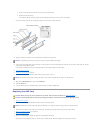
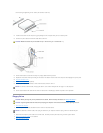
12. Replace the card cage.
a. Align the tabs in the side of the card cage with the slots on the side of the computer, and slide the card cage down into place.
b. Make sure that the riser board is fully seated in the connector on the system board.
13. Reconnect any cables that you removed in step6.
14. Connect any cables that should be attached to the card.
See the documentation for the card for information about the card's cable connections.
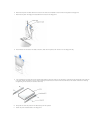
15. Close the computer cover.
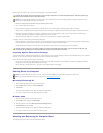
16. Attach the computer stand (optional).
17. Connect your computer and devices to their electrical outlets, and turn them on.
18. Install any drivers required for the card as described in the card documentation.
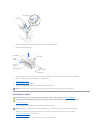
Adding Memory
You can increase your computer memory by installing memory modules on the system board. For information on the type of memory supported by your
computer, look under "Memory" in "Technical Specifications."
1. Shut down the computer.
2. Turn off any attached devices and disconnect them from their electrical outlets.
3. Disconnect the computer power cable from the wall outlet, and then press the power button to ground the system board.
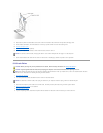
4. Remove the computer stand, if it is attached.
5. Open the computer cover.
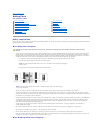
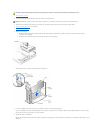
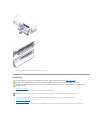
6. If necessary, remove a memory module:
CAUTION: Some network adapters automatically start the computer when they are connected to a network. To guard against electrical shock, be
sure to unplug your computer from its electrical outlet before installing any cards.
NOTICE: Do not route card cables over or behind the cards. Cables routed over the cards can prevent the computer cover from closing properly or
cause damage to the equipment.
NOTICE: To connect a network cable, first plug the cable in to the network wall jack and then plug it in to the computer.
CAUTION: Before you begin any of the procedures in this section, follow the safety instructions in "Safety Instructions."
CAUTION: To guard against electrical shock, always unplug your computer from the electrical outlet before opening the cover.
HINT: Memory purchased from Dell is covered under your computer warranty.
NOTICE: To disconnect a network cable, first unplug the cable from your computer and then unplug it from the network wall jack.