


Removing and Installing Parts 143
6
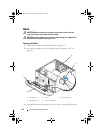
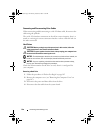
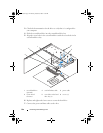
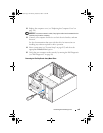
Replace and tighten the four screws to secure the hard drive.
7
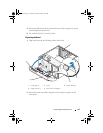
Connect the power and data cables to the drive.
8
Connect the data cable to the system board.
9
Check all cables to be certain that they are properly connected and firmly
seated.
10
Replace the computer cover (see "Replacing the Computer Cover" on
page 176).
NOTICE: To connect a network cable, first plug the cable into the network port or
device and then plug it into the computer.
11
Connect your computer and devices to electrical outlets, and then turn
them on.
12
See the documentation that came with the drive for instructions on
installing any software required for drive operation.
13
Check the System Setup for drive configuration changes (see "Entering
System Setup" on page 188).
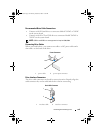
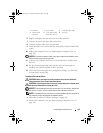
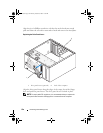
Installing a Second Hard Drive
CAUTION: Before you begin any of the procedures in this section, follow the
safety instructions in the Product Information Guide.
CAUTION: To guard against electrical shock, always unplug your computer from
the electrical outlet before removing the cover.
NOTICE: To avoid damage to the drive, do not set it on a hard surface. Instead, set
the drive on a surface, such as a foam pad, that will sufficiently cushion it.
NOTE: For additional drives, extra screws are not shipped during initial purchase of
the computer, but are shipped with the additional drives.
1
Follow the procedures in "Before You Begin" on page 105.
2
Remove the computer cover (see "Removing the Computer Cover" on
page 107).
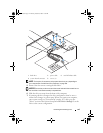
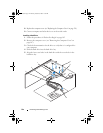
1 hard drive 2 power cable 3 serial ATA data cable
4 system board
connector
5 screw holes in the
hard drive bay (4)
6 screws(4)
book.book Page 143 Monday, October 6, 2008 11:28 AM