


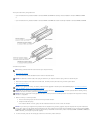

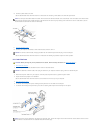
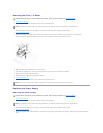


11. Remove the microprocessor from the socket.
Leave the release lever extended in the release position so that the socket is ready for the new microprocessor.
Installing the Microprocessor
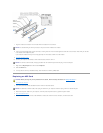
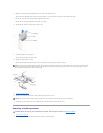
1. If the release lever on the ZIF socket is not extended to the release position, move it to that position.
2. Align pin-1 (the beveled corner) of the microprocessor package and pin-1 of the socket.
3. Carefully set the microprocessor in the socket and press it down lightly to seat it.
4. Rotate the lever back toward the system board until it snaps into place, securing the microprocessor package.
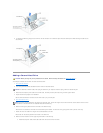
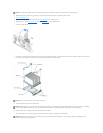
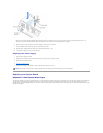
5. If you are installing a new heat sink, remove the film covering the bottom of the heat sink.
6. Lower the heat sink to the microprocessor so that the heat sink fits in the retention base.
7. For each of the replacement metal clips, fit the end of the clip that does not have the latch over its tab on the retention base. Then, fit the middle of the
clip over the middle tab on the retention base, and press down on the clip's latch to secure the clip to the retention base.
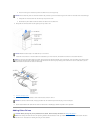
8. Lower the airflow shroud over the heat sink.
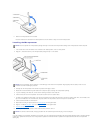
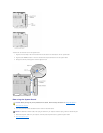
9. Reconnect the cooling fan power cable to the FAN2 connector on the system board.
10. Plug the +12-VDC P2 DC power cable into the J5C1 connector on the system board.
11. Close the computer cover.
12. Connect your computer and devices to their electrical outlets, and turn them on.
If you are installing a microprocessor replacement kit from Dell, return the original heat sink assembly and microprocessor package to Dell in the same package
in which your replacement kit was sent. Your microprocessor replacement kit should include a replacement microprocessor heat sink and one replacement
securing clip.
NOTICE: You must position the microprocessor package correctly in the socket to avoid permanent damage to the microprocessor and the computer.
NOTICE: The microprocessor pins are delicate. To avoid damage, ensure that the microprocessor aligns properly with the socket, and do not use
excessive force when installing the processor.
NOTICE: To connect a network cable, first plug the cable into the network wall jack and then plug it into the computer.