


72 Installing System Components
3
Open the system. See "Opening the System" on page 45.
4
Remove the expansion card stabilizer. See "Removing the Expansion-Card
Stabilizer" on page 65.
5
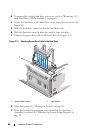
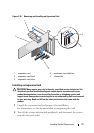
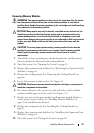
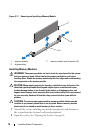
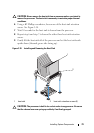
Open the expansion-card latch and remove the filler bracket. See
Figure 3-16.
NOTE: Keep this bracket in case you need to remove the expansion card.
Filler brackets must be installed over empty expansion-card slots to maintain
FCC certification of the system. The brackets also keep dust and dirt out of the
system and aid in proper cooling and airflow inside the system.
6
Holding the card by its edges, position the card so that the card-edge
connector aligns with the expansion-card connector on the expansion-card
riser.
7
Insert the card-edge connector firmly into the expansion-card connector
until the card is fully seated.
8
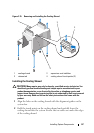
Close the expansion-card latch. See Figure 3-16.
9
Connect all cables to the expansion card.
10
Replace the expansion-card stabilizer. See "Installing the Expansion-Card
Stabilizer" on page 65.
11
Close the system. See "Closing the System" on page 46.
SAS Controller Expansion Card
Read the installation instructions in the documentation for your SAS
controller card. Install the card in the expansion card connector (see
"Installing an Expansion Card" on page 71), and connect the hard-drive
activity indicator cable from the card to the HD_ACT_CARD (AUXLED1)
connector on the system board (see Figure 6-1 to locate the connector).
Secure the cables to the slots to manage the slack.
For information on connecting hard drives, see "Hard Drives" on page 57.