


26 | Optical Drive
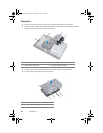
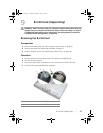
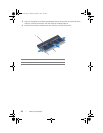
4 Carefully pry the optical-drive bezel and remove it from the optical-drive assembly.
5 Remove the screws that secure the optical-drive bracket to the optical drive.
6 Remove the optical-drive bracket.
Replacing the Optical Drive
Procedure
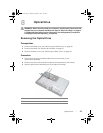
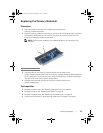
1 Align the screw holes on the optical-drive bracket with the screw holes on the
optical drive.
2 Replace the screws that secure the optical-drive bracket to the optical drive.
3 Align the tabs on the optical-drive bezel with the slots on the optical-drive
assembly and snap the optical-drive bezel into place.
4 Slide the optical-drive assembly into the optical-drive bay until it is fully seated.
5 Replace the screw that secures the optical-drive assembly to the chassis.
6 Connect the power and data cable to the connector on the optical-drive assembly.
Postrequisites
1 Replace the back cover. See "Replacing the Back Cover" on page 20.
2 Replace the stand. See "Replacing the Stand" on page 18.
3 Replace the stand cover. See "Replacing the Stand Cover" on page 16.
4 Follow the instructions in "After Working Inside Your Computer" on page 13.
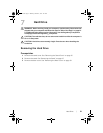
1 optical-drive bezel 2 optical drive
3 optical-drive bracket 4 screws (2)
1
2
3
4
book.book Page 26 Monday, October 8, 2012 4:27 PM