


Power-Button Assembly | 59
Replacing the Power-Button Assembly
Procedure
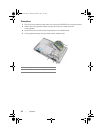
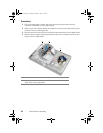
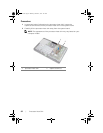
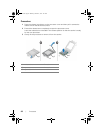
1 Place the power-button assembly on the middle frame and then slide it toward the
bottom of the computer. Ensure that the slot on the power-button assembly is
secured under the tab on the middle frame.
2 Align the screw hole on the power-button assembly with the screw hole on the
middle frame.
3 Replace the screw that secures the power-button assembly to the middle frame.
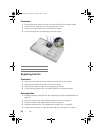
4 Route the power-button and hard-drive activity light cable through the
routing guides.
5 Connect the power-button and hard-drive activity light cable to the connector
(PWRCN1) on the system board.
Postrequisites
1 Replace the system-board shield. See "Replacing the System-Board Shield" on
page 36.
2 Replace the back cover. See "Replacing the Back Cover" on page 20.
3 Replace the stand. See "Replacing the Stand" on page 18.
4 Replace the stand cover. See "Replacing the Stand Cover" on page 16.
5 Follow the instructions in "After Working Inside Your Computer" on page 13.
book.book Page 59 Monday, October 8, 2012 4:27 PM