


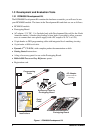


12 RabbitCore RCM4000
2.3 Run a Sample Program
If you already have Dynamic C installed, you are now ready to test your programming
connections by running a sample program. Start Dynamic C by double-clicking on the
Dynamic C icon or by double-clicking on dcrab_XXXX.exe in the Dynamic C root
directory, where XXXX are version-specific characters.
If you are using a USB port to connect your computer to the RCM4000, choose Options >
Project Options
and select “Use USB to Serial Converter” under the Communications
tab. You may have to determine which COM port was assigned to the RS-232/USB
converter.
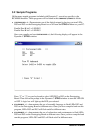
2.3.1 Run a Sample Program
Find the file PONG.C, which is in the Dynamic C SAMPLES folder. To run the program,
open it with the File menu, compile it using the Compile menu, and then run it by selecting
Run in the Run menu. The STDIO window will open on your PC and will display a small
square bouncing around in a box.
2.3.2 Troubleshooting
If Dynamic C appears to compile the BIOS successfully, but you then receive a communi-
cation error message when you compile and load a sample program, it is possible that your
PC cannot handle the higher program-loading baud rate. Try changing the maximum
download rate to a slower baud rate as follows.
• Locate the Serial Options dialog in the Dynamic C Options > Project Options >
Communications
menu. Select a slower Max download baud rate.
If a program compiles and loads, but then loses target communication before you can
begin debugging, it is possible that your PC cannot handle the default debugging baud
rate. Try lowering the debugging baud rate as follows.
• Locate the Serial Options dialog in the Dynamic C Options > Project Options >
Communications
menu. Choose a lower debug baud rate.
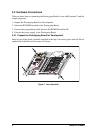
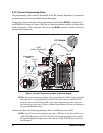
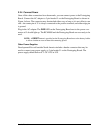
If you receive the message No Rabbit Processor Detected, the programming
cable may be connected to the wrong COM port, a connection may be faulty, or the target
system may not be powered up. First, check to see that the power LED on the Prototyping
Board is lit and that the jumper across pins 5–6 of header JP10 on the Prototyping Board is
installed. If the LED is lit, check both ends of the programming cable to ensure that it is
firmly plugged into the PC and the programming port on the Prototyping Board. Ensure
that the module is firmly and correctly installed in its connectors on the Prototyping Board.
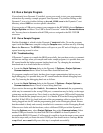
If there are no faults with the hardware, select a different COM port within Dynamic C.
From the Options menu, select Project Options, then select Communications. Select
another COM port from the list, then click OK. Press <Ctrl-Y> to force Dynamic C to
recompile the BIOS. If Dynamic C still reports it is unable to locate the target system, repeat
the above steps until you locate the active COM port.You should receive a message Bios
compiled successfully once this step is completed successfully.