


Enterasys X-Pedition 8000/8600 Getting Started Guide 81
Installing the Hardware
5. Push the PHY card into the slot until the 96-pin connector is firmly seated on the motherboard.
6. Fasten the PHY card to the system unit with the two captive screws. Torque to 5 in-lb (0.56
N-m).
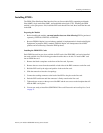
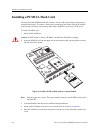
Connecting ATM PHY Cards
The following are instructions on how to attach cables to the various PHY interface cards.
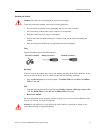
APHY-67 and APHY-77
To attach the segment cables to your APHY-67 and APHY-77 card:
1. Align the transmit cable connector with the transmit port and the receive cable connector with
the receive port.
2. Push one connector into the PHY port and rotate clockwise 1/4 turn to lock it in place.
3. Repeat step 2 for the second cable.
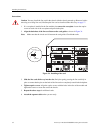
APHY-82V
To attach the segment cables to your APHY-82V card:
1. Align the key of the modular jack (MJ) plug with the locking key of the MJ receptacle.
2. Push the MJ plug into the receptacle until the plug mates fully with the locking key. You will
hear a snapping sound when the locking key engages.
Note: The APHY-82V is not a T1 interface. It merely allows you to connect to a T1 CSU—the
T1 CSU will allow you to connect to a T1 circuit.
APHY-92V
To attach the segment cables to your APHY-92V card:
1. Align the key of the modular jack (MJ) plug with the locking key of the MJ receptacle.
2. Push the MJ plug into the receptacle until the plug mates fully with the locking key. You will
hear a snapping sound when the locking key engages.
Note: The APHY-92V is not an E1 interface. It merely allows you to connect to an E1 CSU—the
E1 CSU will allow you to connect to an E1 circuit.
APHY-21 and APHY-29IR
To attach the segment cables to your APHY-21 and APHY-29IR card:
1. Remove the dust caps from the PHY port and cable.