


30
Printing From Start to Finish
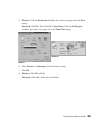
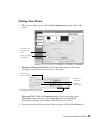
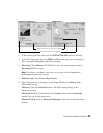
5. To see a preview of the selected P.I.M. image, check the
PRINT Image Matching
Preview
box.
6. Click the
Open
button. Your image opens and the window remains on the screen.
7. Select and open more P.I.M. images, or click
Cancel
to close the
Open PRINT
Image Matching file
window. (If you don’t want the window to remain on the
screen after you open a file, uncheck
Import consecutively
.)
8. Follow the steps in the next section to print your P.I.M. image.
To keep the P.I.M. header information intact for use in other P.I.M.-enabled
programs, keep the original file; don’t use the Photoshop
Save
command. Instead use
Save As
to rename the file. It won’t contain P.I.M. header information, but will
retain P.I.M. image quality, as long as the file is saved with the ICC profile embedded.
Note: If you overwrite your original file, you will lose all P.I.M. header information.
Printing a P.I.M. Image
P.I.M. images are converted into the EPSON RGB 2001 color space. To retain
P.I.M. quality and enhancements, don’t change the color space.
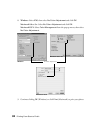
Note: The illustrations in the sections below show Macintosh screens; Windows
screens will look different, but the settings are the same.
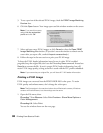
1. Open the File menu, then:
Photoshop 7.0 or Elements: Select
Print Preview > Show More Options >
Color Management
.
Photoshop 6.0: Select
Print
.
You see the window shown on the next page.
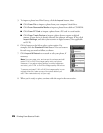
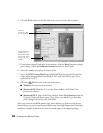
Note: If you see this screen,
select Use the embedded
profile and click OK.