


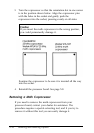

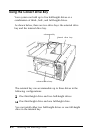


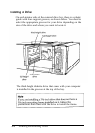


If you are installing a hard disk, it is best to install it in the
internal bay. This reserves the external bay for any accessible
drives you may want to add later. If you prefer, however, you
can install a hard disk in the external bay; just leave the drive
slot cover installed in the front panel.
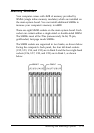
You can install 3½-inch drives in the internal bay. In the
external bay, you can install 5¼-inch drives or 3½-inch drives
with 5¼-inch mounting frames attached.
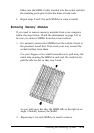
You also need to attach metal drive brackets to each drive you
install in the external bay. Two sets of these brackets (and their
retaining screws) came in the box with your computer. The
instructions in this chapter tell you how to install them.
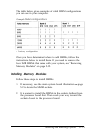
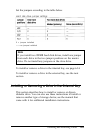
Setting the IDE Hard Disk Drive Jumpers
You may need to change the hard disk drive jumper settings if
you install or remove an IDE hard disk drive. The jumpers tell
the computer whether you are using one hard disk drive or two.
Note
You do not need to set any jumpers if you are removing
your only hard disk drive.
If you are installing only one hard disk drive, see “Changing
the Jumper Settings” below to check your drive’s jumpers.
If you are removing one hard disk drive and leaving another in
your computer, you need to change the jumper settings on the
remaining drive to indicate that it is the only hard disk drive
installed.
Installing and Removing Drives
6-3