


32 Maintaining Your All-in-One
Replacing Ink Cartridges
Make sure you have a new ink cartridge before you begin. You must install new
cartridges immediately after removing the old ones.
Caution:
Do not open ink cartridge packages until you are ready to install the ink. Cartridges are
vacuum packed to maintain reliability.
Leave your old cartridges in the Epson Stylus Photo RX595 Series until you are ready to
replace them to prevent the print head nozzles from drying out.
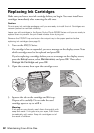
Remove the CD/DVD tray and return the output tray to the paper position before
replacing ink cartridges (see page 5).
1. Turn on the RX595 Series.
If a cartridge is low or expended, you see a message on the display screen. Note
which cartridges need to be replaced and press
OK.
If you’re replacing a cartridge before you see a message on the display screen,
press the
Setup button, select Maintenance, and press OK. Then select
Change Ink Cartridge and press OK.
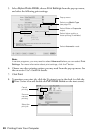
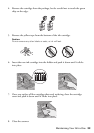
2. Open the scanner, then open the cartridge cover.
3. Squeeze the tab on the cartridge and lift it up.
Dispose of it carefully. Do not take the used
cartridge apart or try to refill it.
Warning:
If ink gets on your hands, wash them thoroughly with
soap and water. If ink gets into your eyes, flush them
immediately with water. Keep ink cartridges out of
the reach of children.