


ZEUS Technical Manual Getting started
© 2007 Eurotech Ltd Issue D 16
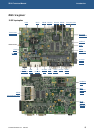
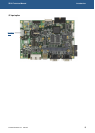
Getting started
A ZEUS Quickstart Manual is provided with each Development Kit to enable you to set
up and start using the ZEUS board. Please read the relevant manual and follow the
steps explaining how to set up the board. Once you have completed this task, and your
ZEUS system is working, you can start adding further peripherals enabling
development to begin.
This section explains how to set up and use some of the features of the ZEUS. For
more detailed information on any aspect of the board see the section Detailed
hardware description
, page 18.
Using the ZEUS
Using the CompactFlash socket
The ZEUS is fitted with a Type I/II CompactFlash socket mounted on the solder side of
the board. The socket is connected to Slot 0 of the PXA270 PC card interface. It
supports 3.3V Type I and II CompactFlash cards, for both memory and I/O. The ZEUS
supports hot swap changeover of the cards and notification of card insertion.
For more details see Expansion interfaces
, page 38.
5V CompactFlash cards are not supported.
Using the serial interfaces (RS232/422/485)
The four standard serial port interfaces on the ZEUS are fully 16550 compatible.
Connection to the serial ports is made via two DB9 connectors, a 20-way header and a
simple 5 way header. The pin assignment of the 20 way header has been arranged to
enable 9-way IDC D-Sub plugs to be connected directly to the cable. See the section
J19 – Serial ports – COM3/4
, page 88, for pin assignments and connector details.
See the section Serial COM ports
, page 53, for further details.
Using the audio features
There are four audio interfaces supported on the ZEUS: amp out, line out, line in and
microphone. The line in, line out and amp interfaces support stereo signals and the
microphone provides a mono input. The amplified output is suitable for driving an 8Ω
load with a maximum power output of 250mW per channel.
Connections are routed to J11. See the sections Audio
, page 49, and J4 – Audio
connector
, page 79, for further details.
Using the USB ports
The standard dual USB type ‘A’ connector is provided on the front panel. See the
sections USB
, page 51, and J8 – USB connector, page 81, for further details.