


R
ESTRICTED USE ONLY Fargo Electronics, Inc.
Persona C10/M10 ID Card Printer Service Manual (Rev. 4.0)
4
Selecting Card Size _________________________________________________________ 52
Determining the number of Copies _____________________________________________ 53
Selecting the Default Graphic Resolution ________________________________________ 54
Document Options____________________________________________________________ 55
Selecting Ribbon Type_________________________________________________________ 55
Selecting from the Ribbon Type options _________________________________________ 56
Selecting from the Color Matching options_______________________________________ 58
Using the Image Controls ______________________________________________________ 60
Controlling the Dye-Sub Intensity (YMCB) ______________________________________ 61
Controlling the Resin Heat ___________________________________________________ 62
Using the default Dither Mode ________________________________________________ 63
Selecting the K Panel Graphics Mode option _____________________________________ 64
Selecting K Panel Only (95%) / (99%) __________________________________________ 65
Selecting the Print Edge-to-Edge option _________________________________________ 66
Selecting the Rotate 180 Degrees option_________________________________________ 67
Selecting the Overlay option __________________________________________________ 68
Using the Magnetic Encoding Options ____________________________________________ 70
Using the Magnetic Encoding Mode option ______________________________________ 71
Selecting the Magnetic Track Options___________________________________________ 72
Selecting the Track Bit Density option __________________________________________ 73
Selecting the Track LRC Generation option ______________________________________ 74
Selecting the Track Character Size option________________________________________ 75
Selecting the Track Character Parity option ______________________________________ 76
Selecting the Track Character ASCII Offset option ________________________________ 77
Selecting the Shift Data Left option ____________________________________________ 78
Selecting the Verify Magnetic Encoding option ___________________________________ 79
Reviewing ISO Track Locations _______________________________________________ 80
Sending Track Information ___________________________________________________ 81
Entering Track Information ___________________________________________________ 81
Reviewing Tracks 1, 2, and 3 (in Table format) ___________________________________ 82
Reviewing the Track Data Note________________________________________________ 82
Reviewing the ASCII Code and Character Table __________________________________ 83
Selecting Smart Clipping Rectangle ____________________________________________ 84
Selecting the Disable Printing option ___________________________________________ 85
Selecting the Calibration window ________________________________________________ 86
Using the Image Placement controls ____________________________________________ 87
Selecting the Self Test button _________________________________________________ 89
Selecting Write Direct to Port _________________________________________________ 89
Printing a Card_______________________________________________________________ 90
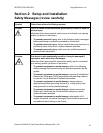
Section 5: Diagnostic Tools, Calibration, and Interface Information____________________ 91
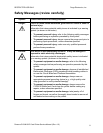
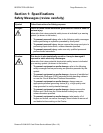
Safety Messages (review carefully)_______________________________________________ 91
Calibrating the Printhead _______________________________________________________ 93
Adjusting the RP1 Potentiometer ______________________________________________ 93
Aligning the Headlift Sensor __________________________________________________ 94
Positioning the Headlift Cam__________________________________________________ 94
Making Mechanical Adjustments to the Printhead _________________________________ 95
Calibrating the Ribbon Sensor________________________________________________ 100
Adjusting the RP2 Potentiometer _____________________________________________ 101
Adjusting the RP2 Potentiometer _____________________________________________ 102
Calibrating the Left Card Sensor ______________________________________________ 103