


38 Installing AC Power Supplies
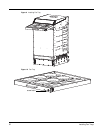
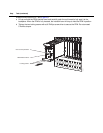
• Two fan trays are installed.
To test the power supplies and fan trays:
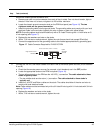
Power Supply and Fan Tray LEDs
Step Task
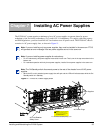
1. With the fan trays and power supplies installed, power on the system.
• Flip the On/Standby switch located next to plug AC-0 to the ON position (down).
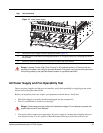
2. Power Supply Status LEDs should be green. If an LED is not lit or is blinking amber:
• check that the units are properly installed and are plugged into the correct slot.
• Verify the power source
• If the LED remains unlit or blinking amber at power up, replace the power supply.
3. Both fan tray LEDs should be green (online). A blinking green fan tray LED indicates booting. Verify
that air is flowing through the chassis. If a fan tray is not operating properly or air is not flowing through
the chassis:
• power off the chassis at the remote power source.
• Ensure that all fan trays are properly installed.
• Verify the remote power source.
• If a fan tray LED remains unlit, replace the fan tray.
4. After you have verified the power and fan operability, power off the chassis to continue the installation
process.
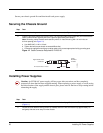
5. De-energize the Main Disconnect and flip the On-Off switch to the OFF position.
6. Verify that the LEDs are not lit.
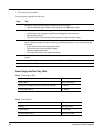
Table 4 Power Supply LEDs
Status LED is ...
No AC power Unlit: No connection
Operational (On/Standby switch may be set to Standby) Lit: GREEN
Power Supply Failure Lit: AMBER
Table 5 Fan Tray LEDs
Status LED is ...
Booting Blinking: GREEN
Fault Detected Lit: YELLOW
Communication Failure Blinking: YELLOW