


74
Replacing Gateway 400VTX Components
www.gateway.com
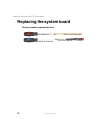
To replace the system board:
1 Disconnect the AC adapter and modem and network cables and prepare
your notebook by following the instructions in “Preparing your notebook”
on page 7.
2 Turn your notebook over so the bottom is facing up.
3 Remove the battery by following the instructions in “Removing the
battery” on page 8.
4 If your notebook has 802.11 wireless networking built in, remove the
802.11 mini PCI module by following the instructions in “Replacing the
802.11 mini PCI card” on page 13.
5 Remove the hard drive kit by following the instructions in “Replacing the
hard drive kit” on page 18.
6 Turn your notebook over so the top is facing up.
7 Remove the keyboard cover by following the instructions in “Replacing
the keyboard cover” on page 25.
8 Remove the keyboard by following the instructions in “Replacing the
keyboard” on page 28.
9 Remove the optical drive by following the instructions in “Replacing the
optical drive kit” on page 34
10 Remove the LED indicator panel by following the instructions in
“Replacing the LED indicator panel” on page 38.
11 Remove the hinge covers by following the instructions in “Replacing the
hinge covers” on page 43.
12 Remove the cooling assembly by following the instructions in “Replacing
the cooling assembly” on page 46.
13 Remove the palm rest assembly by following the instructions in “Replacing
the palm rest assembly” on page 55.
14 Remove the diskette drive kit by following the instructions in “Replacing
the diskette drive kit” on page 60.
-OR-
Remove the memory card reader kit by following the instructions in
“Replacing the memory card reader kit” on page 65.