14 System Setup
Starting your system
Before you start your system for the first time:
■ Refer to the safety information beginning on page 101.
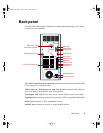
■ Make sure the voltage selector switch on the back of the computer is set
to the correct voltage for your area. This switch is set at the factory to
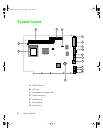
the correct voltage (see “Back panel” on page 5 for voltage selector switch
location).
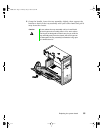
■ Make sure all cables are firmly connected to the proper ports on the back
panel of the computer.
■ Make sure the computer and monitor are plugged into an AC outlet or
power strip.
To start the system:
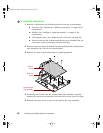
1 If you have connected the system components to a power strip, make
sure all the system components are turned off, then turn on the power
strip.
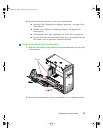
2 Turn on the monitor by pressing the power button.
3 Turn on the computer by pressing the power button. The power
light-emitting diode (LED) on the front panel is lit when the power is on.
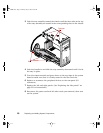
4 Turn on any other components connected to the computer, such as
speakers, a printer, or a scanner.
If nothing happens when you turn on the system:
■ Recheck the power cables to see that they are securely plugged in
and that your power strip (if you are using one) is plugged in and
turned on.
■ Make sure the monitor is connected to the computer, plugged into
the power strip or AC outlet, and turned on. You may also need
to adjust the brightness and contrast controls on the monitor.
Caution Make sure your computer and peripherals are turned off
and unplugged from the power outlet when you connect
peripherals to the computer.
05957.book Page 14 Monday, May 8, 2000 10:09 AM