


PMCS Interface Toolkit Configuring and Using PMCS Wizards • 47
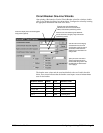
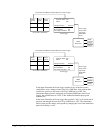
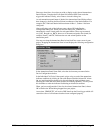
Enter up to three lines of text that you wish to display on the selected Annunciator
Panel indicator. Complete the Event Item field with the DDE Event code that
triggers this indicator. Finally, select Done to close this dialog box.
As each annunciator panel button is labeled, the Annunciator Panel Dialog reflects
these changes by showing the Row/Column coordinates of the labeled buttons. For
example, R1C1 indicates that the indicator button in Row 1, Column 1 has been
configured.
After configuring each of the indicator panes, choose OK in the Device
Configuration dialog box. When you close this dialog box, CIMPLICITY
automatically creates virtual points for each panel button. These tags are named
xxx_R1C1 through xxx_R8C6, where xxx is the name assigned to the wizard (for
example, Panel1), and R1C1 indicates the row and column position on the
annunciator panel.
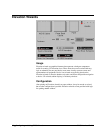
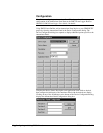
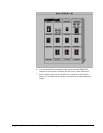
You may now drop the Annunciator Panel wizard itself into a new screen in your
project. Dropping the Annunciator Panel wizard displays the following configuration
dialog box:
In the Annunciator Panel Name field, select the device name you entered in the
Device Configuration window.
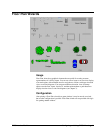
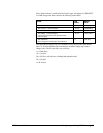
In the Individual Cell Color Values panel, assign colors to each of the annunciator
indicator conditions by clicking in each radio button (Disabled, Alarm Off, Alarm
On, etc) and choosing the desired color for each from the color pulldown menu.
Selecting the Alarm On radio button enables the Flashing checkbox. You may select
this checkbox to make the indicator flash during an Alarm On condition.
When you have configured the Colors for the selected Annunciator Panel, choose
OK to finalize the Wizard being dropped into your project.
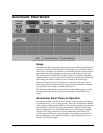
At run-time, CIMPLICITY will receive DDE data from the Event Logger which will
control the colors of all indicators that have been configured properly.