


e1200-320 4Gb Fibre Channel Interface Card user and service guide 21
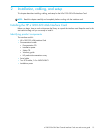
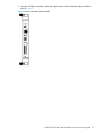
To connect the interface card to a SCSI bus:
1. Power off the SCSI devices on this bus.
2. Connect a SCSI cable to one of the SCSI connectors on the unit. The interface card should always be
installed at the end of the SCSI bus.
3. Make sure that the bus is terminated correctly. By default, the interface card is automatically
terminated. However, the device at the other end of bus must also be terminated.
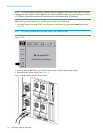
Ethernet connection
A 10/100BaseT Ethernet connection provides management and configuration access. The RJ-45
connector on the unit can be directly connected to a standard 10/100BaseT Ethernet network.
NOTE: You should change the pre-filled in settings if you disable DHCP, because while they are valid
settings, a conflict occurs if more then one interface card is on the network with these initial settings.
Setting the IP network address is recommended, but not required, in order to configure the interface card
from this port. The IP network address can be manually assigned or dynamically assigned (using DHCP).
The default network configuration is DHCP, but if DHCP is turned off, the initial value for the IP address is
1.1.1.1, the Subnet is 255.255.255.0, and the Gateway is 0.0.0.0.
Depending on the network environment, you may be able to temporarily use the IP address of 1.1.1.1 to
configure the interface card. For more about the IP network address, refer to ”Network configuration” on
page 36.
Ethernet capabilities include Telnet support for configuration and management and FTP support for other
management capabilities.
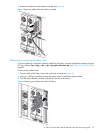
Serial port connection
The 3-pin connector on the interface card provides a serial port that is compatible with RS-232 signaling
levels. The interface card is designed to communicate with a terminal or any operating system using a
terminal emulator. The baud rate, data bits, stop bits, parity, and flow control of both the interface card
and the host system must use the same settings. The Autobaud feature described below provides an
effective method to set the baud rate of the interface card and host system.
Autobaud feature
The Autobaud feature automatically configures the baud rate on the interface card. Once you set the baud
rate in the terminal emulator, wait until the interface card completes the Power-On Self Test (POST) and
then the firmware initialization process. This can take up to 90 seconds, during which time the POST and
initialization information may or may not be visible on the terminal or terminal emulator. After this process
has completed, you can press the Enter key slowly 7 or 8 times (or just type shift-z) and the interface card
automatically detects the baud rate being used by the serial port. The baud rate is then saved in the
interface card’s configuration and is retained through future power cycles.
NOTE: Pressing the Enter key before the POST has completed is of no benefit to the Autobaud feature.
Wait at least 90 seconds until both the POST and the Firmware Initialization processes have completed
before pressing the Enter key.
NOTE: If there is no response using the Enter key, press the space bar slowly 7 or 8 times, and then press
the Enter key slowly 7 or 8 times.
The baud rate used by the terminal or terminal emulator must be 9600, 19200, 38400, 57600, or
115200 for the Autobaud feature to recognize it. The interface card does not function properly at any
other baud rate.