


60 Using the Command Line Interface
Ethernet configuration
This option allows for setting up all Ethernet network settings including IP address, subnet mask, IP
gateway, security settings, Ethernet mode, physical address, and host name.
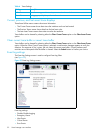
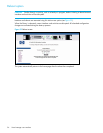
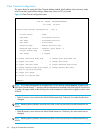
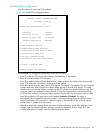
Figure 43 Ethernet configuration menu
• Select 1 to change the IP address of the interface card.
• Select 2 to change the IP subnet mask for the interface card.
• Select 3 to change the IP gateway for the Ethernet network of the interface card.
• Select 4 to change the Ethernet physical address, or MAC address, of the interface card. Since Ethernet
physical addresses are always assigned to Ethernet adapters by the manufacturers, HP recommends
that this setting not be changed.
• Select 5 to toggle the Ethernet mode among the following options:
• 10Mps Only
• 100Mps (half duplex) Only
• 100Mps (full duplex) Only
• 10/100Mps (Auto-Neg.)Default
• Select 6 to change the host name. This is an alphanumeric entry of one word up to 8 characters long.
NOTE: Do not use a capital Z as a part of the host name because this is the autobaud hot key used by the
MS Windows terminal utility for serial connections.
Ethernet Configuration Menu
X.XX.XX XXXXXX XXXXXXXXXXXXXXXX
07/7/2005 08:56:22
IP Address : 192.168.60.203 [DHCP]
Subnet Mask : 255.255.255.0
IP Gateway : 192.168.60.1
Ethernet Physical Address : 00:E0:02:E3:17:51
Ethernet Mode : 10/100Mbps (Auto-Neg)
Hostname : interface card
DHCP Configuration : Enabled
1) Change IP Address
2) Change IP Subnet Mask
3) Change IP Gateway
4) Change Ethernet Physical Address
5) Toggle Ethernet Mode
6) Change Hostname
7) Toggle DHCP Configuration
8) Change Security Settings
X) Return to previous menu