


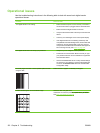

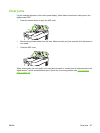
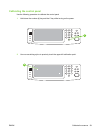
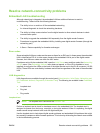

e. Print the second pass (second copy of the file). The final calibration target must look like the
following figure.
Figure 6-2 Scanner calibration target
CAUTION: If the calibration target does not look like the figure shown here, the
calibration process will fail and the quality of the digital-sender scans will be degraded.
Where shown, the black areas must extend completely to the edges of the page. If they
do not, use a black marker to extend the black areas to the edges of the page. If you
have problems printing the calibration target, try using a different printer.
To calibrate the scanner
Use the following procedure to calibrate the scanner:
1. Take the calibration target to the digital sender.
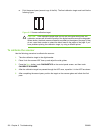
2. Place it into the scanner ADF face-up and adjust the side guides.
3. Press the Menu button, touch DIAGNOSTICS on the control-panel screen, and then touch
CALIBRATE SCANNER.
4. After the calibration target has passed through the ADF once, reposition it in the ADF face down.
5. After completing the second pass, position the target on the scanner glass and initiate the final
pass.
130 Chapter 6 Troubleshooting ENWW