


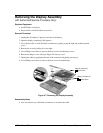


HP OmniBook XE2 Removal and Replacement 2-19
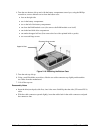
• Tilt the left of the modem PCA up to detach the connector on the bottom.
• Lift the PCA out.
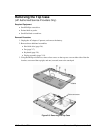
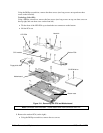
9. Remove the motherboard:
• Using the Phillips screwdriver, remove the two brackets; the left bracket has two screws, and
the right has three.
• Using the Phillips screwdriver, remove the two screws in front (on either side of the battery
connector), the one screw in front of the modem PCA, and the one screw on the right side.
• Using the 5-mm hex driver, remove the standoff on the left side of the VGA connector.
• Lift the motherboard at the rear and slide it out and upward from the bottom case.
Reassembly Notes
Note: Installing a New Motherboard
• If any RAM boards are present, transfer them from the old motherboard to the new one:
• Store the serial number electronically in the new motherboard—see the steps below.
• When reinserting the motherboard, slip the battery connector under the front edge of the bottom
case and drop in place.
• When reinstalling the LED PCA, tilt the PCA toward the back to slip the audio jacks into their
openings, and be sure that the connectors line up on the bottom.
• When reinstalling the CPU module, press only on the two circles near the front edge.
• When reinstalling the floppy disk drive, slip the cable into the cable connector and slide the
connector closed.
• When reinstalling the heatsink, be sure that the insulating material is intact.
Note: Installing a New Bottom Case
• Install a new serial number label and overlay—see the steps below.
Storing the Serial Number Electronically
1. Exit Windows and boot to a DOS prompt.
For Windows 95 or Windows 98, press F8 during reboot and select Command Prompt Only.
For Windows NT, boot from a DOS boot floppy disk.
2. Run ESN.EXE from one of these sources:
On a factory software installation, change to the \Omnibook\Drivers\Hputils directory and
type
esn at the prompt.
Otherwise, copy \Omnibook\Drivers\Hputils\Esn.exe from the OmniBook XE2 Recovery
CD, then run it on the OmniBook.
3. Store the serial number:
If you are prompted for the serial number, type the serial number shown on the bottom of the
case.
If a serial number has already been stored, you must call an HP support center to change it.