


Chapter 10: Configuring the HP Server
100
2. Immediately begin pressing <F2> repeatedly until you see video. If the server has an
Administrator password configured, you are prompted to enter the password. If the server
does not have a password configured the Main screen of the BIOS Setup Utility appears. For
information on the Setup screens, refer to “Primary Screens”.
Record Your Setup Settings
Before altering any settings, record the current values. If the default values ever need to be restored
(after a CMOS clear, for example), run Setup again and refer to the original settings you recorded at
this time.
Navigating Setup Utility Screens
The BIOS Setup Utility consists of five primary menus. Each menu occupies a single screen and
presents a list of menu items. Some menu items are sub-menus, while others are settings that you can
change from the screen. The following table describes how to navigate the utility screens and menus:
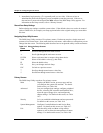
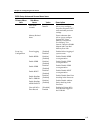
Table 10-3. Using the Setup Screens
Press To
←
Scroll left through the main menu screens.
→
Scroll right through the main menu screens.
ENTER Select a sub-menu item or accept a drop-down choice.
TAB Select a field within a value (e.g. date field).
F9 Select the default value.
F10 Save your changes and exit Setup.
ESC Go back to a previous screen.
↑
Scroll up through menu items or value lists.
↓
Scroll down through menu items or value lists.
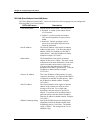
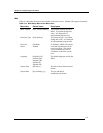
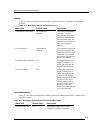
Primary Screens
The BIOS Setup Utility uses these five primary screens:
Main Displays the BIOS version, processor type, and lets
you configure the system time and date. For details
on this screen, see Table 10-4.
Advanced Lets you configure boot settings, configure peripheral
devices, select the IDE controller and hard disk drive,
select the type of floppy drive, and configure the
chipset settings. For details on this screen, see Table
10-5.
Security Let’s you establish Administrator and user passwords.
For details on this screen, see Table 10-6.
System Management Configure Console Redirection and Service Boot
options. For details on this screen, see Table 10-7.
Exit Exits the utility with or without saving utilities
options as well as allows the management of custom
settings. For details on this screen, see Table 10-8.