


Chapter 3 Hardware Installation and Configuration
IMPORTANT After you have installed the HP Server Remote Management
Card, you should install the Visual Diagnostic Panel that was
shipped with the Remote Management Card. Refer to
Appendix I for instructions.
Flashing the Server's System BIOS
After you have installed the HP Server Remote Management Card, you must flash
the server system BIOS. Flashing the BIOS populates the sensor data repository
on the Remote Management Card. This is required to make environmental data
available to the Management Card’s web interface.
1. Insert the HP Netserver Navigator CD supplied with the HP Server
Remote Management Card in the Server's CD-ROM drive and reboot.
2. Flash (i.e., update) the system BIOS.
3. When you have finished, remove the HP Netserver Navigator CD and
reboot the system.
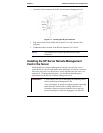
Verifying Card Installation
Each time the HP Server Remote Management Card is powered up, a built-in
self-test procedure automatically executes.
Self Test Power Up Sequence
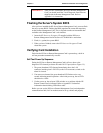
During the HP Server Remote Management Card's self test, observe the
diagnostic LED located just below the card's RS-232 port (refer to Figure 3-3).
1. The green (heartbeat) LED (located immediately above the LAN
connector) and the green LAN LED (on the LAN connector) switch on for
about 10 seconds.
2. If no errors are detected, the green heartbeat LED flashes twice every
second, indicating normal operation. After initial power-up, the red LED
should not be visible.
3. If, after power up, the red error LED switches on, a problem with the HP
Remote Control card is indicated. Refer to Appendix E for detailed
information about blinking LED failure codes.
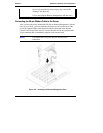
Before you can use the HP Server Remote Management Card, an independent
communications link (LAN or modem) must be set up, cabled, and properly
18