


Chapter 1 Quick Start
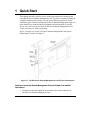
2. Install the HP Server Remote Management Card in PCI slot 6.
3. Connect the free end of the 50-pin ribbon cable to the 50-pin connector on
the server's system board. The connector is keyed.
IMPORTANT After you have installed the HP Server Remote Management
Card, you must flash the server system BIOS. Flashing the
BIOS populates the sensor data repository on the Remote
Management Card. This is required to make environmental
data available to the Management Card’s web interface.
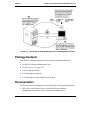
Install and connect the Diagnostic Card that was shipped with your HP Server
Remote Management Card (see Appendix I for detailed instructions):
Set up the remote connection (see Chapter 4 for detailed instructions):
1. Set up the LAN or modem connection that allows the HP Server Remote
Management Card to communicate with a remote client:
◊ For a LAN connection: Connect your dedicated 10/100Base-T
compatible LAN line to the card's RJ-45 LAN connector.
◊ For a modem connection: Connect a serial modem cable (not
provided) to the card's serial port and connect the other end to an
external modem.
2. Boot the server. During Power-On Self-Test, when prompted, press F3 to
enter the HP Server Remote Management Card BIOS setup program.
◊ If you plan on connecting to the HP Server Remote Management
Card via the LAN: Define card's TCP/IP properties (either use a
unique IP Address for the card, subnet mask, and gateway, or enable
DHCP and have your DHCP server assign these addresses for you).
◊ If you plan on connecting to the HP Server Remote Management
Card via modem: Define the card's PPP settings (modem initialization
string, IP address, subnet mask). Typically, you would leave the PPP
IP address and PPP subnet mask at the factory defaults since your PPP
connection does not interact with the site network.
3. Save the configuration and exit.
4. At a remote client running Microsoft Windows NT 4.0 or Windows 95, 98,
ME or 2000:
2