


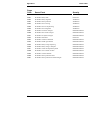


Appendix C Installing and Using TFTP
In the following procedure, you format a floppy disk to include system (boot)
capability and load the software (drivers, applications) that you want run during
the boot process. Finally when you have provided all necessary software
components to the disk, you copy an image of the floppy to your TFTP server
using copydisk.exe.
To create a floppy boot image:
1. Insert a 1.44MB floppy disk in drive A and format it. This could be at a
Windows 95, 98 or 2000 client, but to ensure that the diskette has enough
room for all the files, use a system with MS-DOS 6.x. At a DOS prompt:
enter the command
format /s a:
The /s parameter instructs DOS to include the system on the disk, making
the disk bootable.
2. Copy all drivers and software (e.g. BIOS update) to the floppy disk drive.
Create an appropriate autoexec.bat file on the floppy to run the desired
program(s).
3. Using the HP Copydisk utility, create a floppy boot image file in the root
directory of your TFTP server. Use the following syntax:
copydisk a: x:\path\filename.dsk
where a: is the source diskette and x:\path\filename is the
destination drive, path and filename with a .dsk extension for your image
file. An image file is created and transferred to the designated directory.
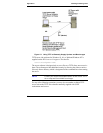
Initiating a Remote Boot Using a Floppy Boot Image
There are two ways to boot the HP Server using a remote boot image:
• Remote Boot Option 1 requires "hands-on" access at the HP Server.
• Remote Boot Option 2 uses the HP Server Remote Management Card web
interface.
Remote Boot Option 1
To use Remote Boot Option 1 method, you must have properly configured the HP
Server Remote Management Card. Refer to "Running the HP Server Remote
Management Card BIOS Setup Program" in Chapter 4.
In Remote Boot Option 1, you start from the user interface stored in the HP
Server Remote Management Card ROM based setup options.
1. Boot the HP Server.
80