


116
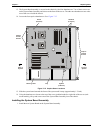
Chapter 7 Replacing Parts
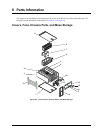
Removing the Diagnostic Board
1. Power down the HP Server. Refer to “Powering Down the HP Server tc4100” on page 14.
2. Disconnect the power cord(s).
3. If rack-mounted, extend the HP Server out of the rack.
4. Remove left cover (pedestal) or top cover (rack-mounted) from the HP Server. Refer to “Opening and
Closing the HP Server tc4100” on page 21.
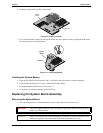
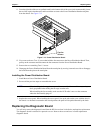
Figure 7-14. Diagnostic Board Removal
5. Remove the signal connectors from the diagnostic board.
6. Push the diagnostic board cover to the right; lift the board from the chassis.
7. Separate the diagnostic board from the cover. The cover will be used with the replacement diagnostic board.
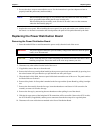
Installing the Diagnostic Board
1. Install the replacement diagnostic board in the cover saved earlier.
WARNING The power supplies continue to provide standby voltage to the HP Server until the power
cord(s) is/are disconnected.
NOTE Wear a wrist strap and use a static-dissipating work surface connected to the chassis
when handling components. Ensure that the metal of the wrist strap contacts your skin.
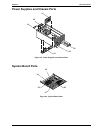
Visual
Diagnostic
Board
Tab
(4 Places)
Tab slot
(4 Places
)
1
2